F5
F5 ファイアウォールを設定し、Glasswall Halo ICAP サーバーと統合するには、この設定ガイドに従ってください。
注: これらの手順は、F5 version BIG-IP 17.1.1.3, Build 0.0.5, Point Release 3 に基づいて記載されています。
インターフェースとルートを設定する
- Before configuring the interfaces, ensure you can see 3 interfaces under Network -> Interfaces -> Interface list.
- 注: ここにはデータプレーンのインターフェースが表示されており、管理インターフェースは含まれていません。
- インターフェース名は 1.1、1.2、1.3 になります。
- 各インターフェースの MAC アドレスを、ファイアウォール VM に接続されているインターフェース上の MAC アドレスと比較し、各インターフェースがどのサブネットに属するかをメモしてください。
- In the dev environment:
1.1はinside subnetに属します1.2はoutside subnetに属します1.3はicap subnetに属します。

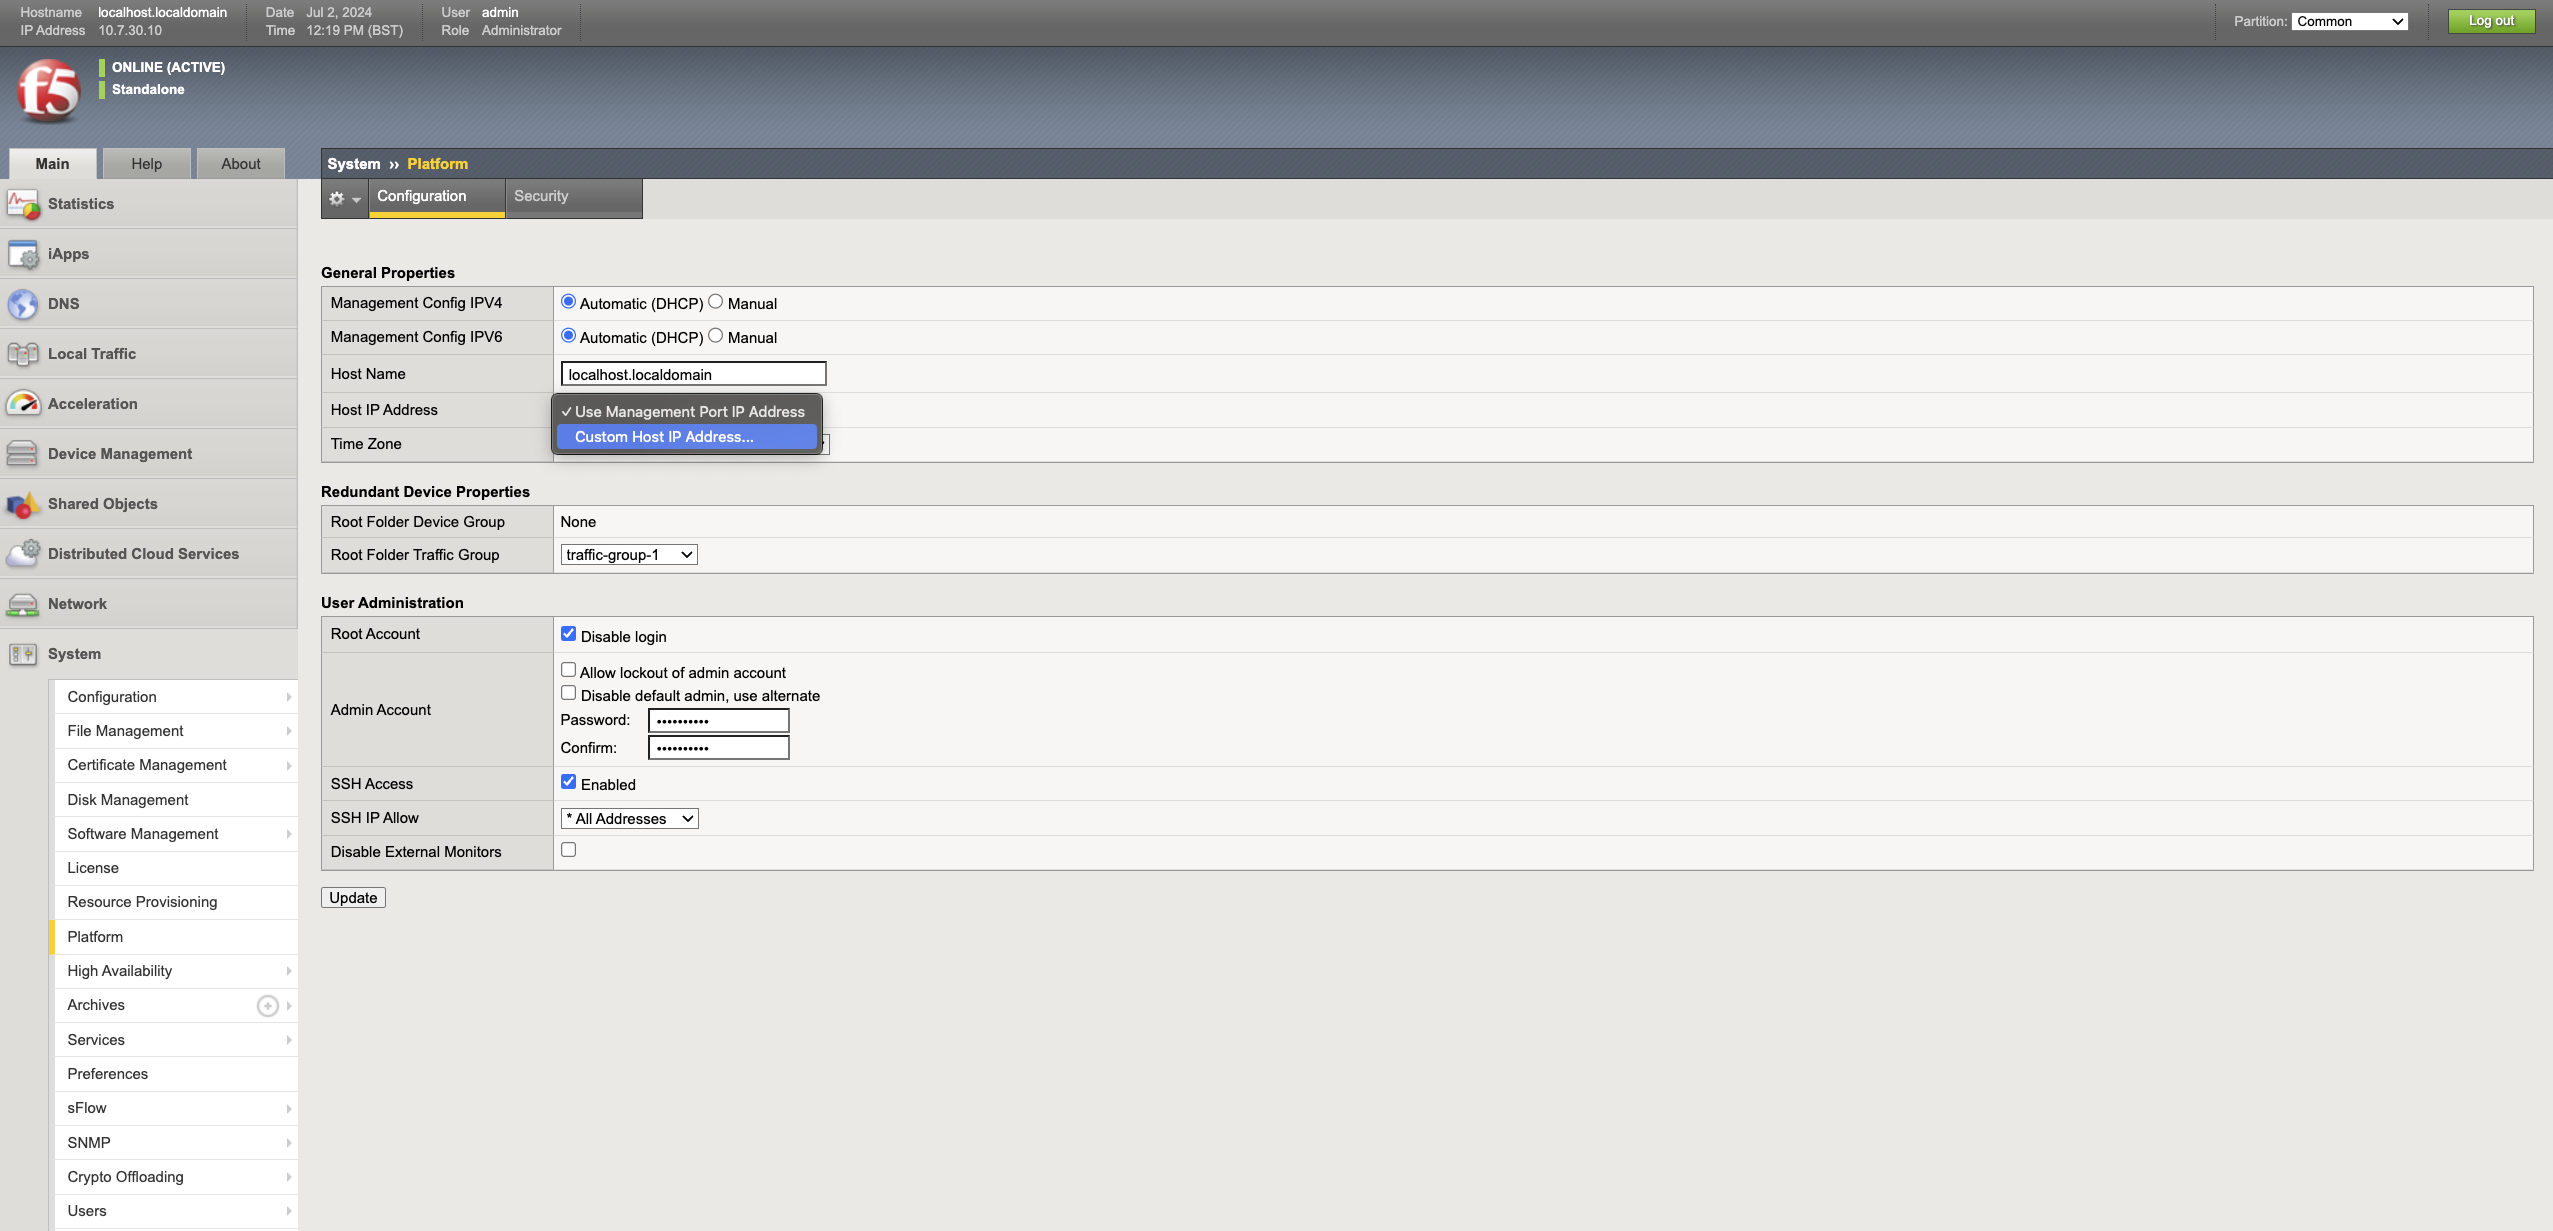
1 - 管理 IP アドレスを設定する
通常、ファイアウォールに接続された最初のインターフェースは管理インターフェースとして設定されます。何らかの理由で管理 UI が別のインターフェース(IP アドレス)で動作している場合は、次の手順に従って管理 IP アドレスを変更してください。
- F5 Admin Portal にログインします。
- System -> Platform に移動します。
- Host IP address のドロップダウンで、Custom host IP address を選択し、新しい IP を入力します。
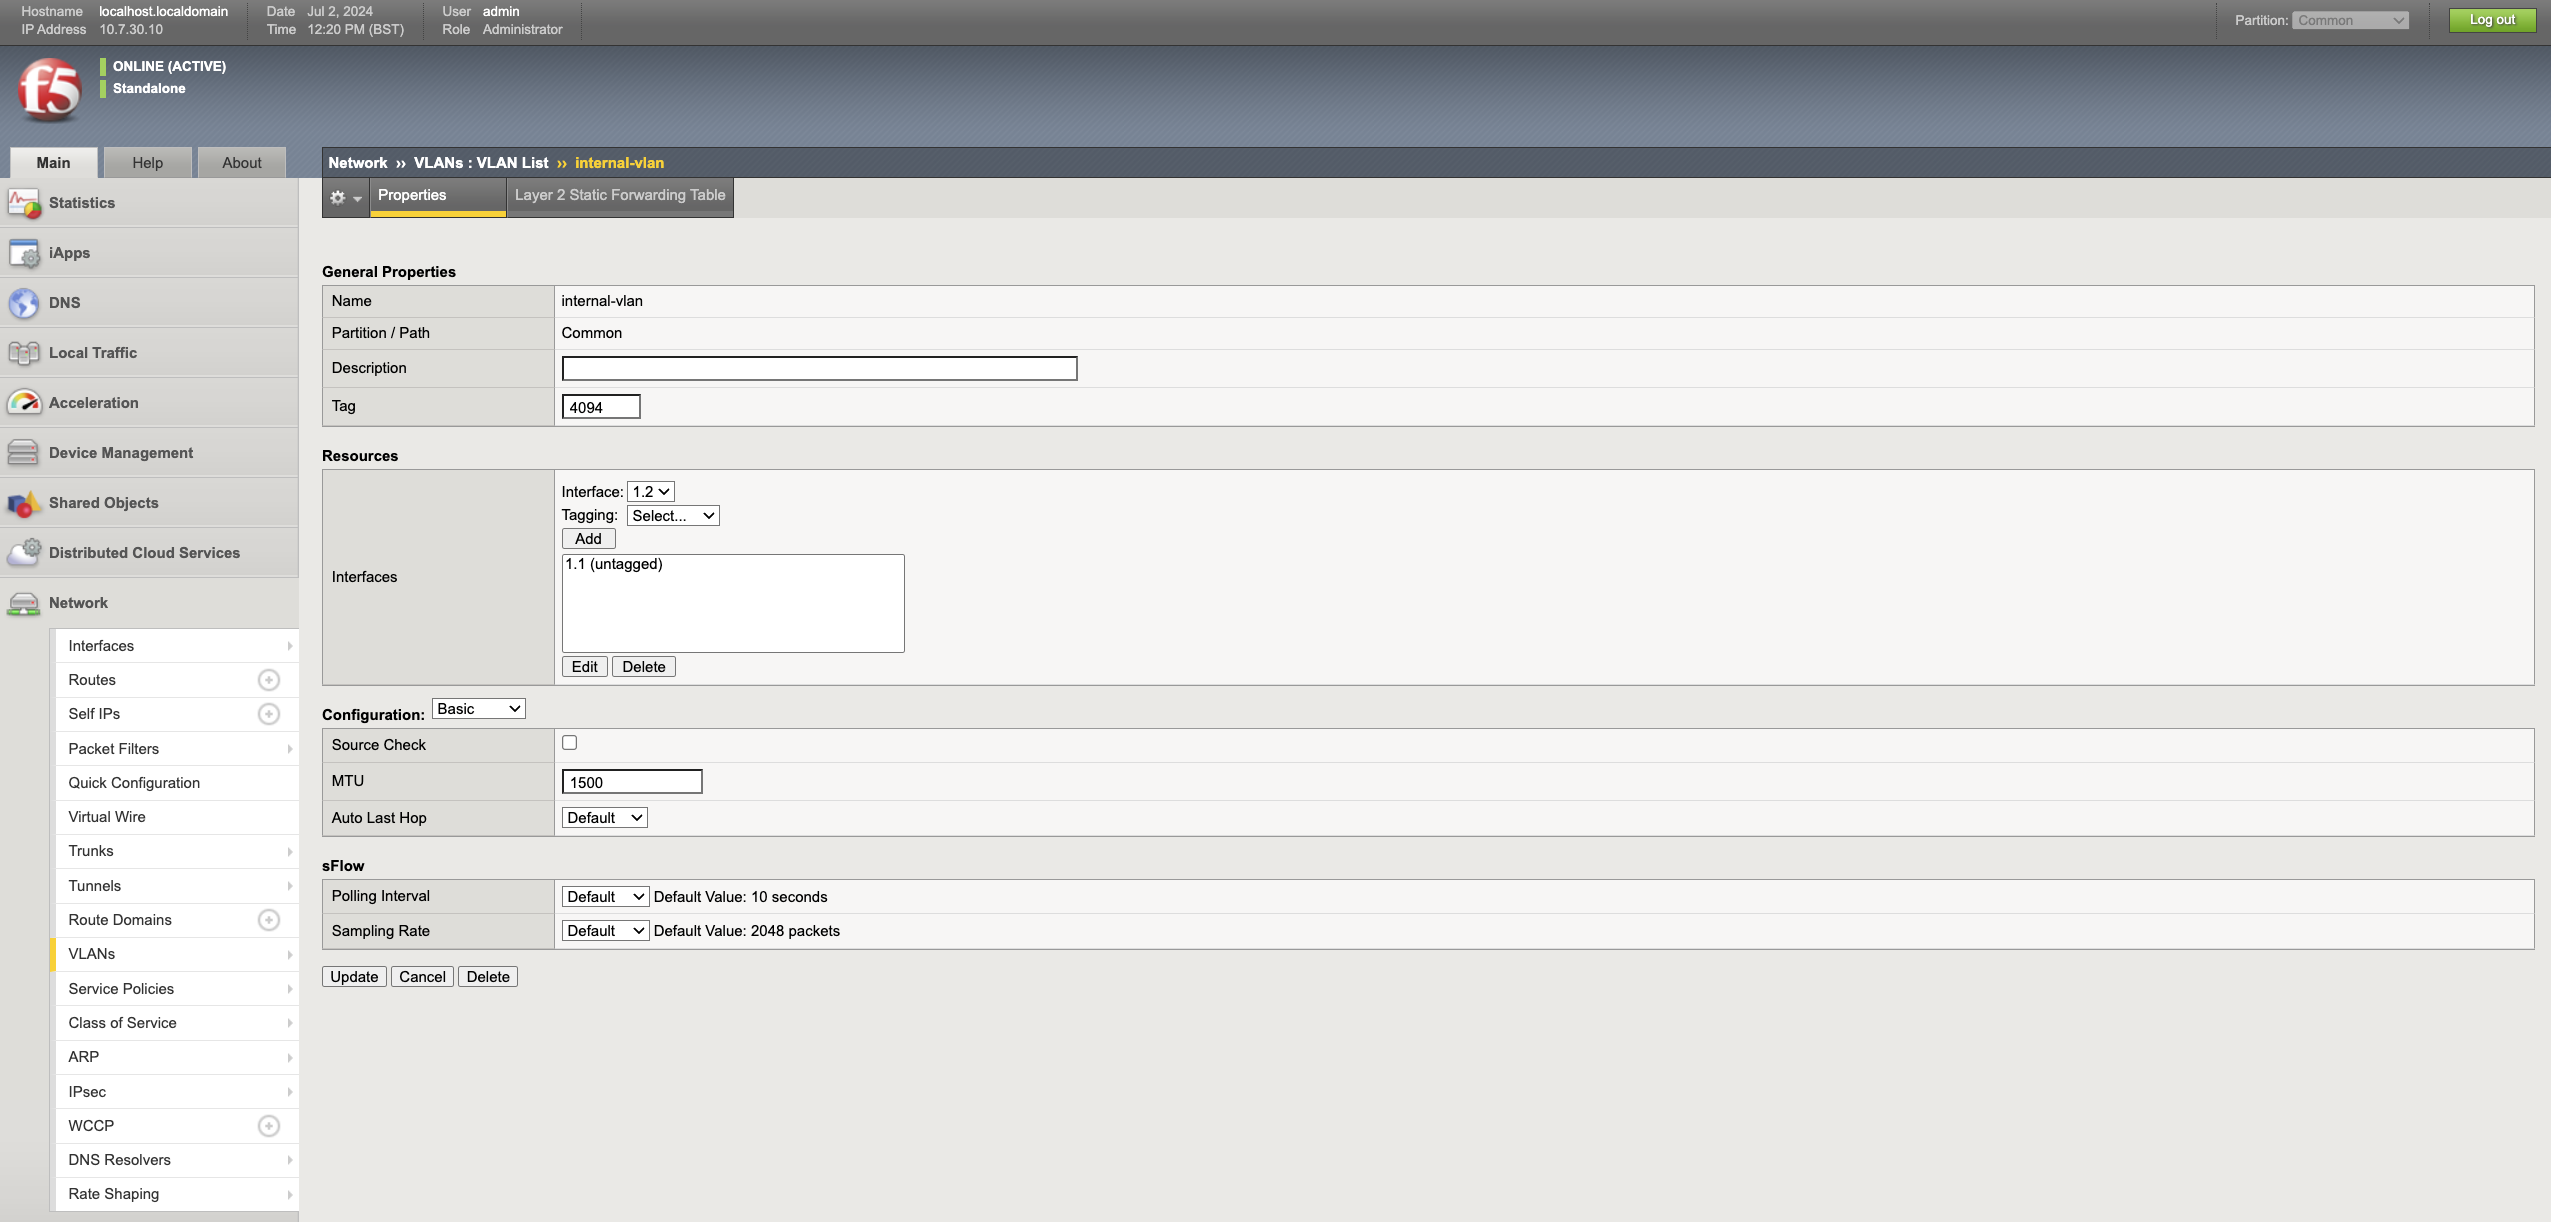
2 - 内部インターフェースを設定
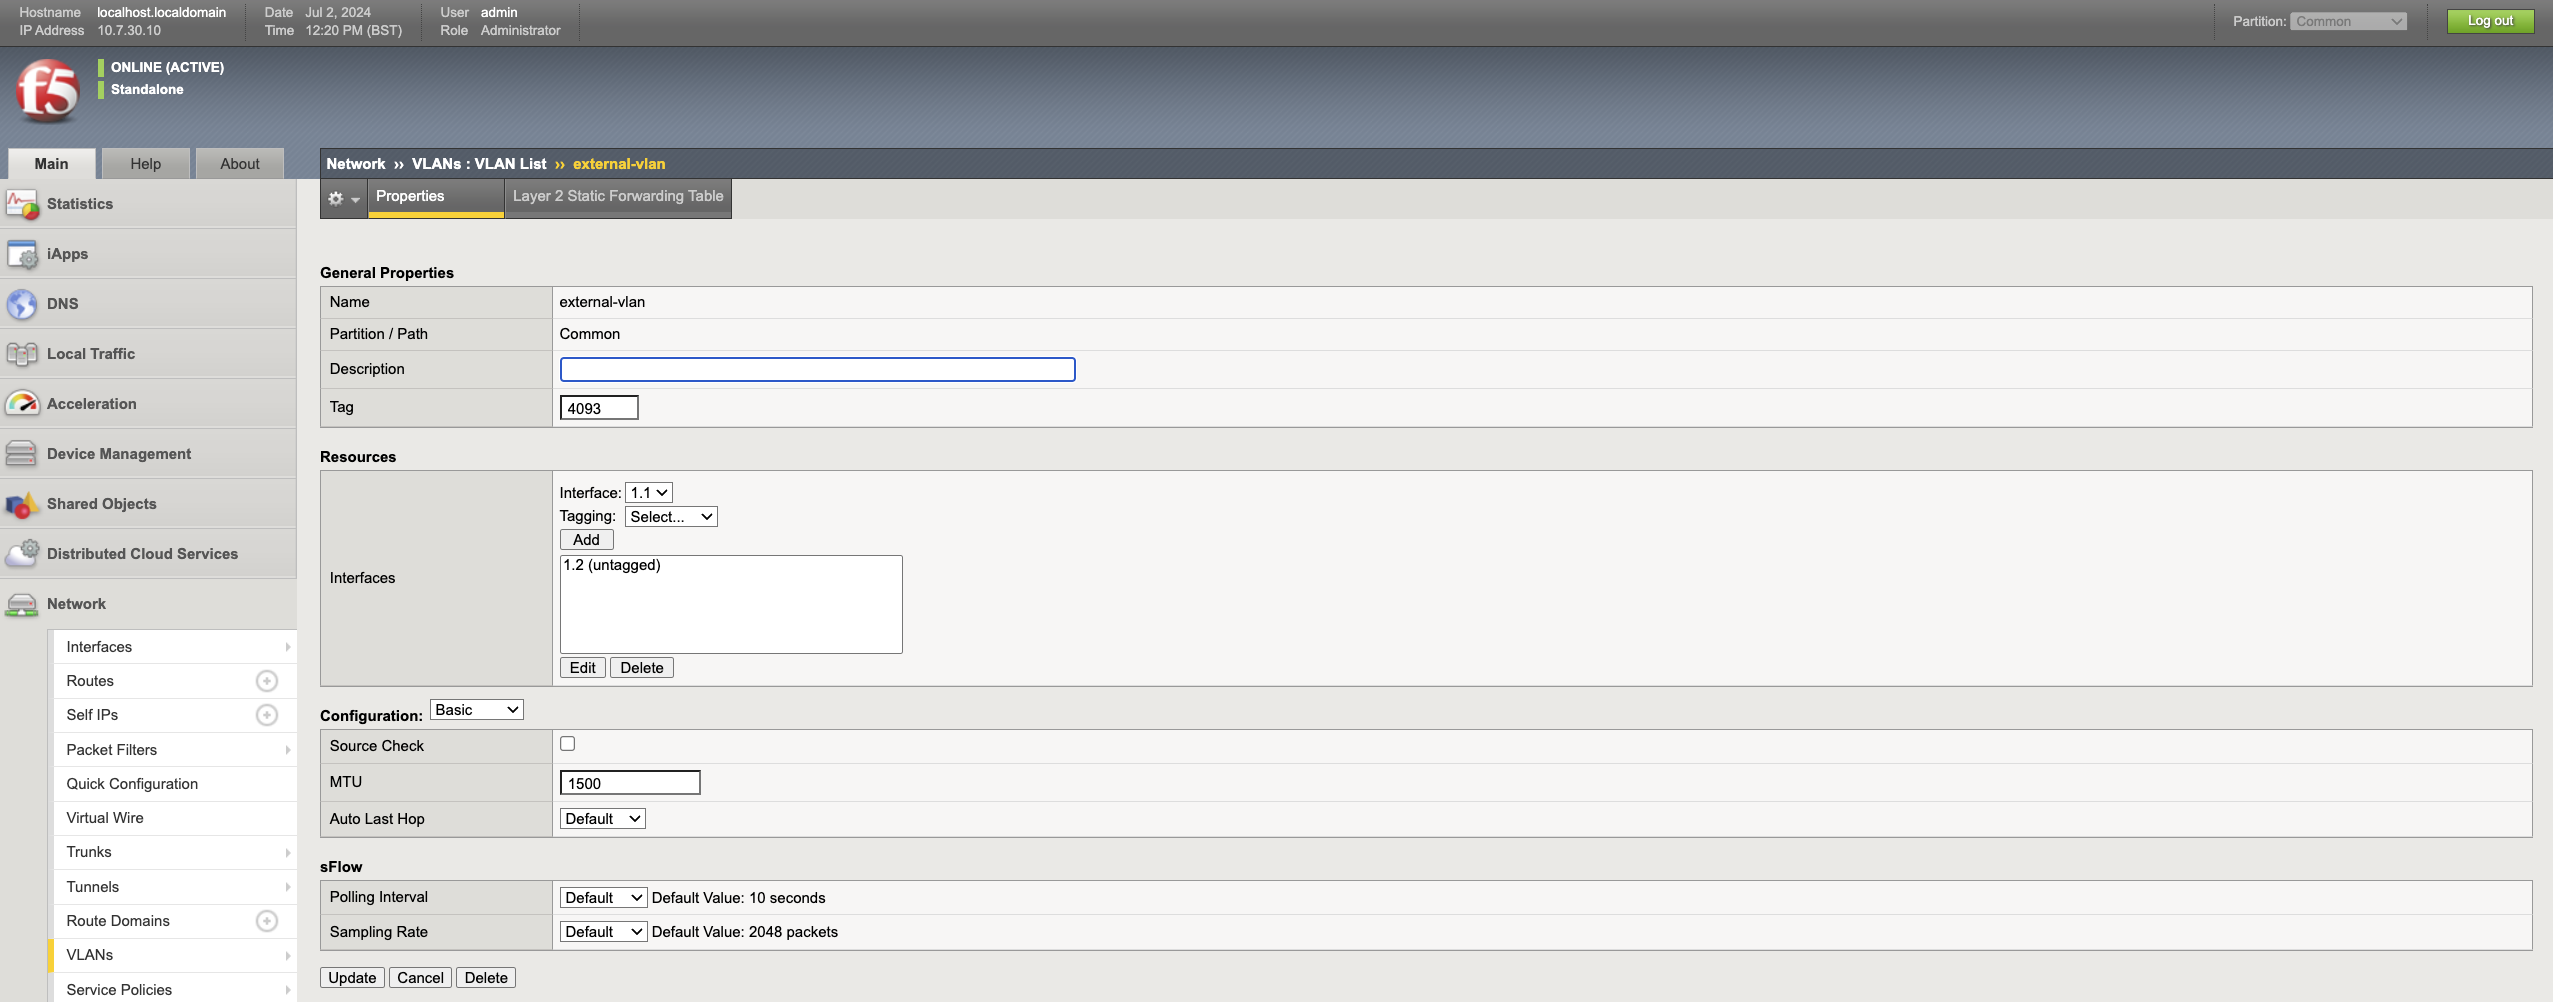
- Network -> VLANs -> VLANs list に移動し、Create をクリックします。
- 名前に
inside-vlanを入力します。 - ドロップダウンから内部インターフェースを選択し、Add をクリックします。
注: インターフェース名は
1.1、1.2、1.3になります。前の手順では、MAC アドレスに基づいて、そのインターフェースが属するサブネットをメモしています。 - Finished をクリックします。
- Network -> Self IPs に移動し、Create をクリックします。
- 名前に
inside-ipを入力し、内部インターフェースの IP アドレスとネットマスクを入力します。 - VLAN ドロップダウンから
inside-vlanを選択し、Finished をクリックします。
3 - 外部インターフェースを設定
- Network -> VLANs -> VLANs list に移動し、Create をクリックします。
- 名前に
outside-vlanを入力します。 - ドロップダウンから外部インターフェースを選択し、Add をクリックします。
- Finished をクリックします。
- Network -> Self IPs に移動し、Create をクリックします。
- 名前を
inside-ipとして入力し、外部インターフェイスの IP アドレスとネットマスクを入力します。 - VLAN ドロップダウンから
outside-vlanを選択し、Finished をクリックします。
4 - ICAP インターフェースを設定
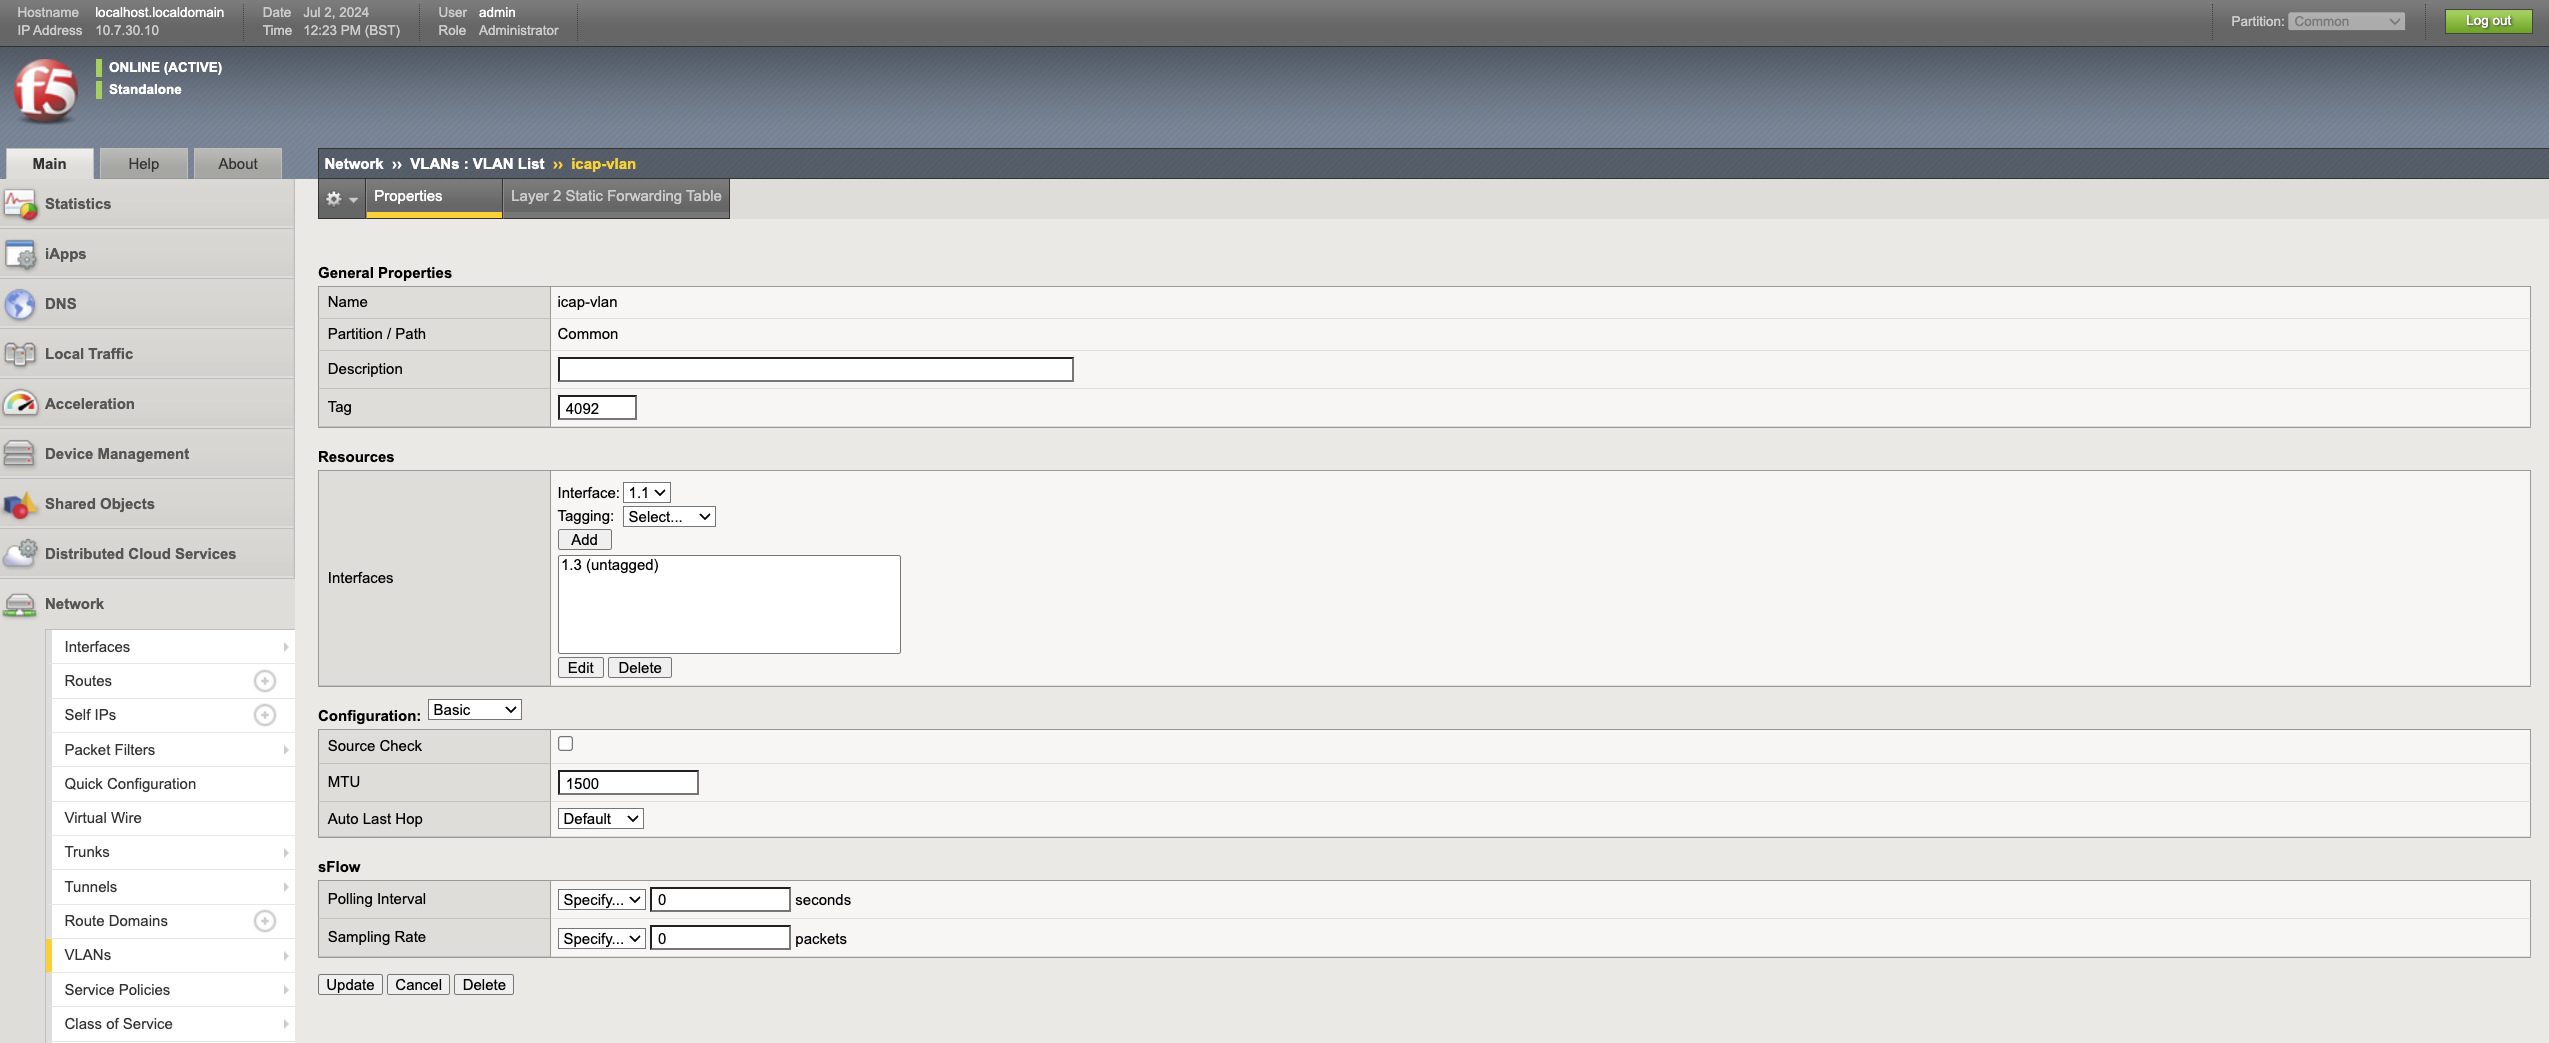
- Network -> VLANs -> VLANs list に移動し、Create をクリックします。
- 名前として
icap-vlanを入力します。 - ドロップダウンから ICAP インターフェースを選択し、Add をクリックします。
- Finished をクリックします。
- Network -> Self IPs に移動し、Create をクリックします。
- 名前として
icap-ipを入力し、ICAP インターフェースの IP アドレスとネットマスクを入力します。 - VLAN ドロップダウンから
icap-vlanを選択し、Finished をクリックします。
ICAP 統合
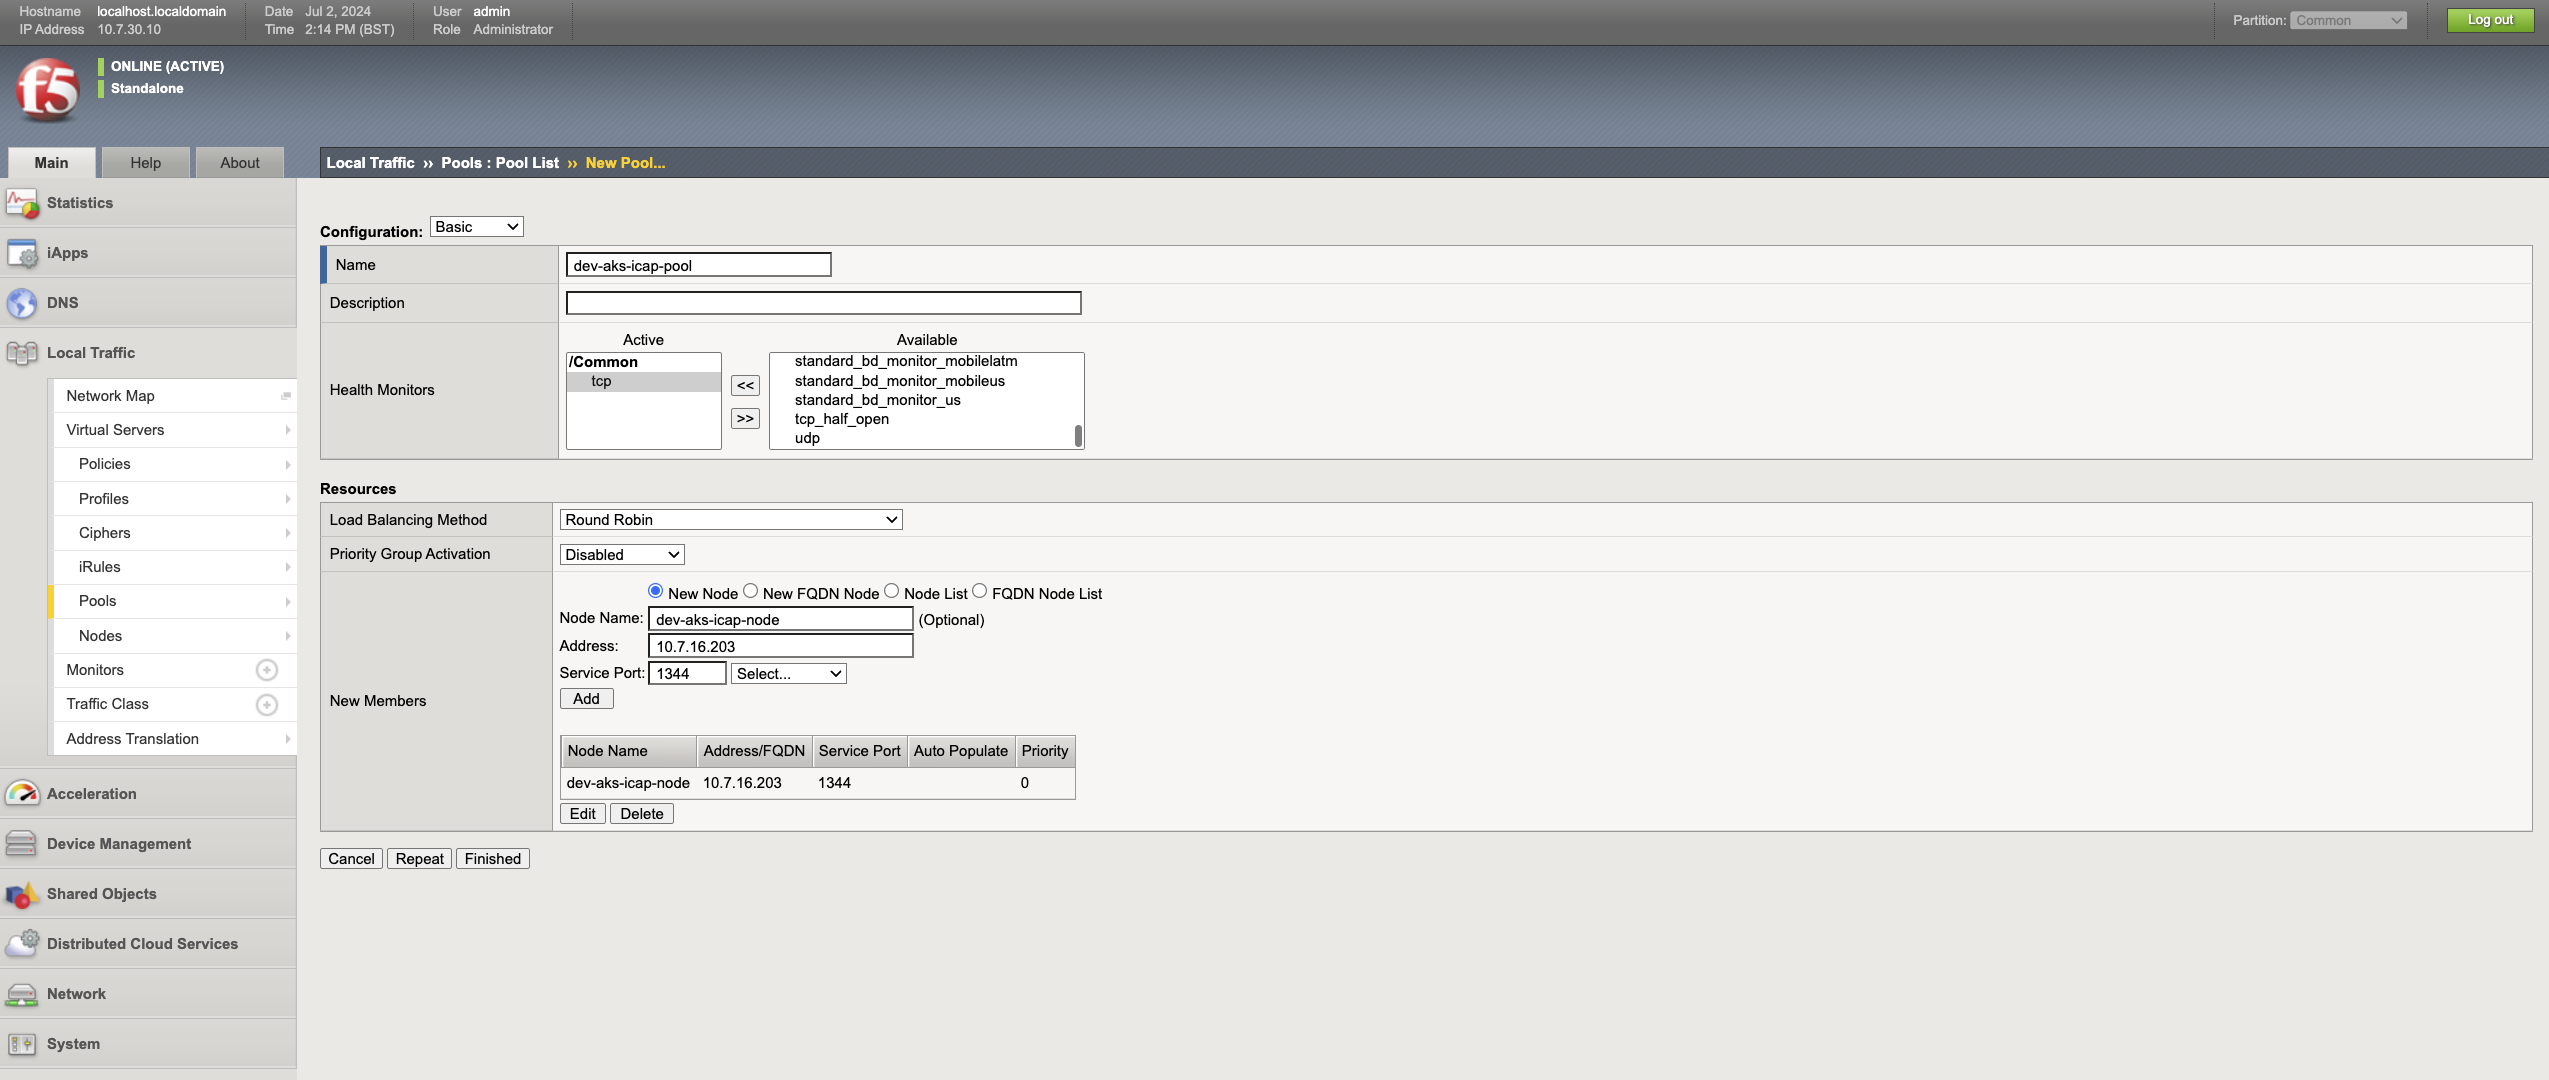
1 - ICAP プールを作成
ICAP プールは、ICAP サーバーのプールを表します。
- Local traffic -> Pools に移動し、Create をクリックします。
- 適切な名前と説明を入力します。例: Name -
dev-aks-icap-pool、Description -ICAP Pool for Dev AKS env。 - Under Health monitors, select
tcpfrom the Available column and move it to the Active column. - 適切な Node name を入力します。例:
dev-aks-icap-node。 - ICAP サーバーの IP アドレスを入力し、サービス ポートを
1344として指定して、Add をクリックします。 - Finished をクリックして設定を保存します。ヘルスチェックが成功するとステータスは緑色で表示され、失敗した場合は赤色で表示されます。
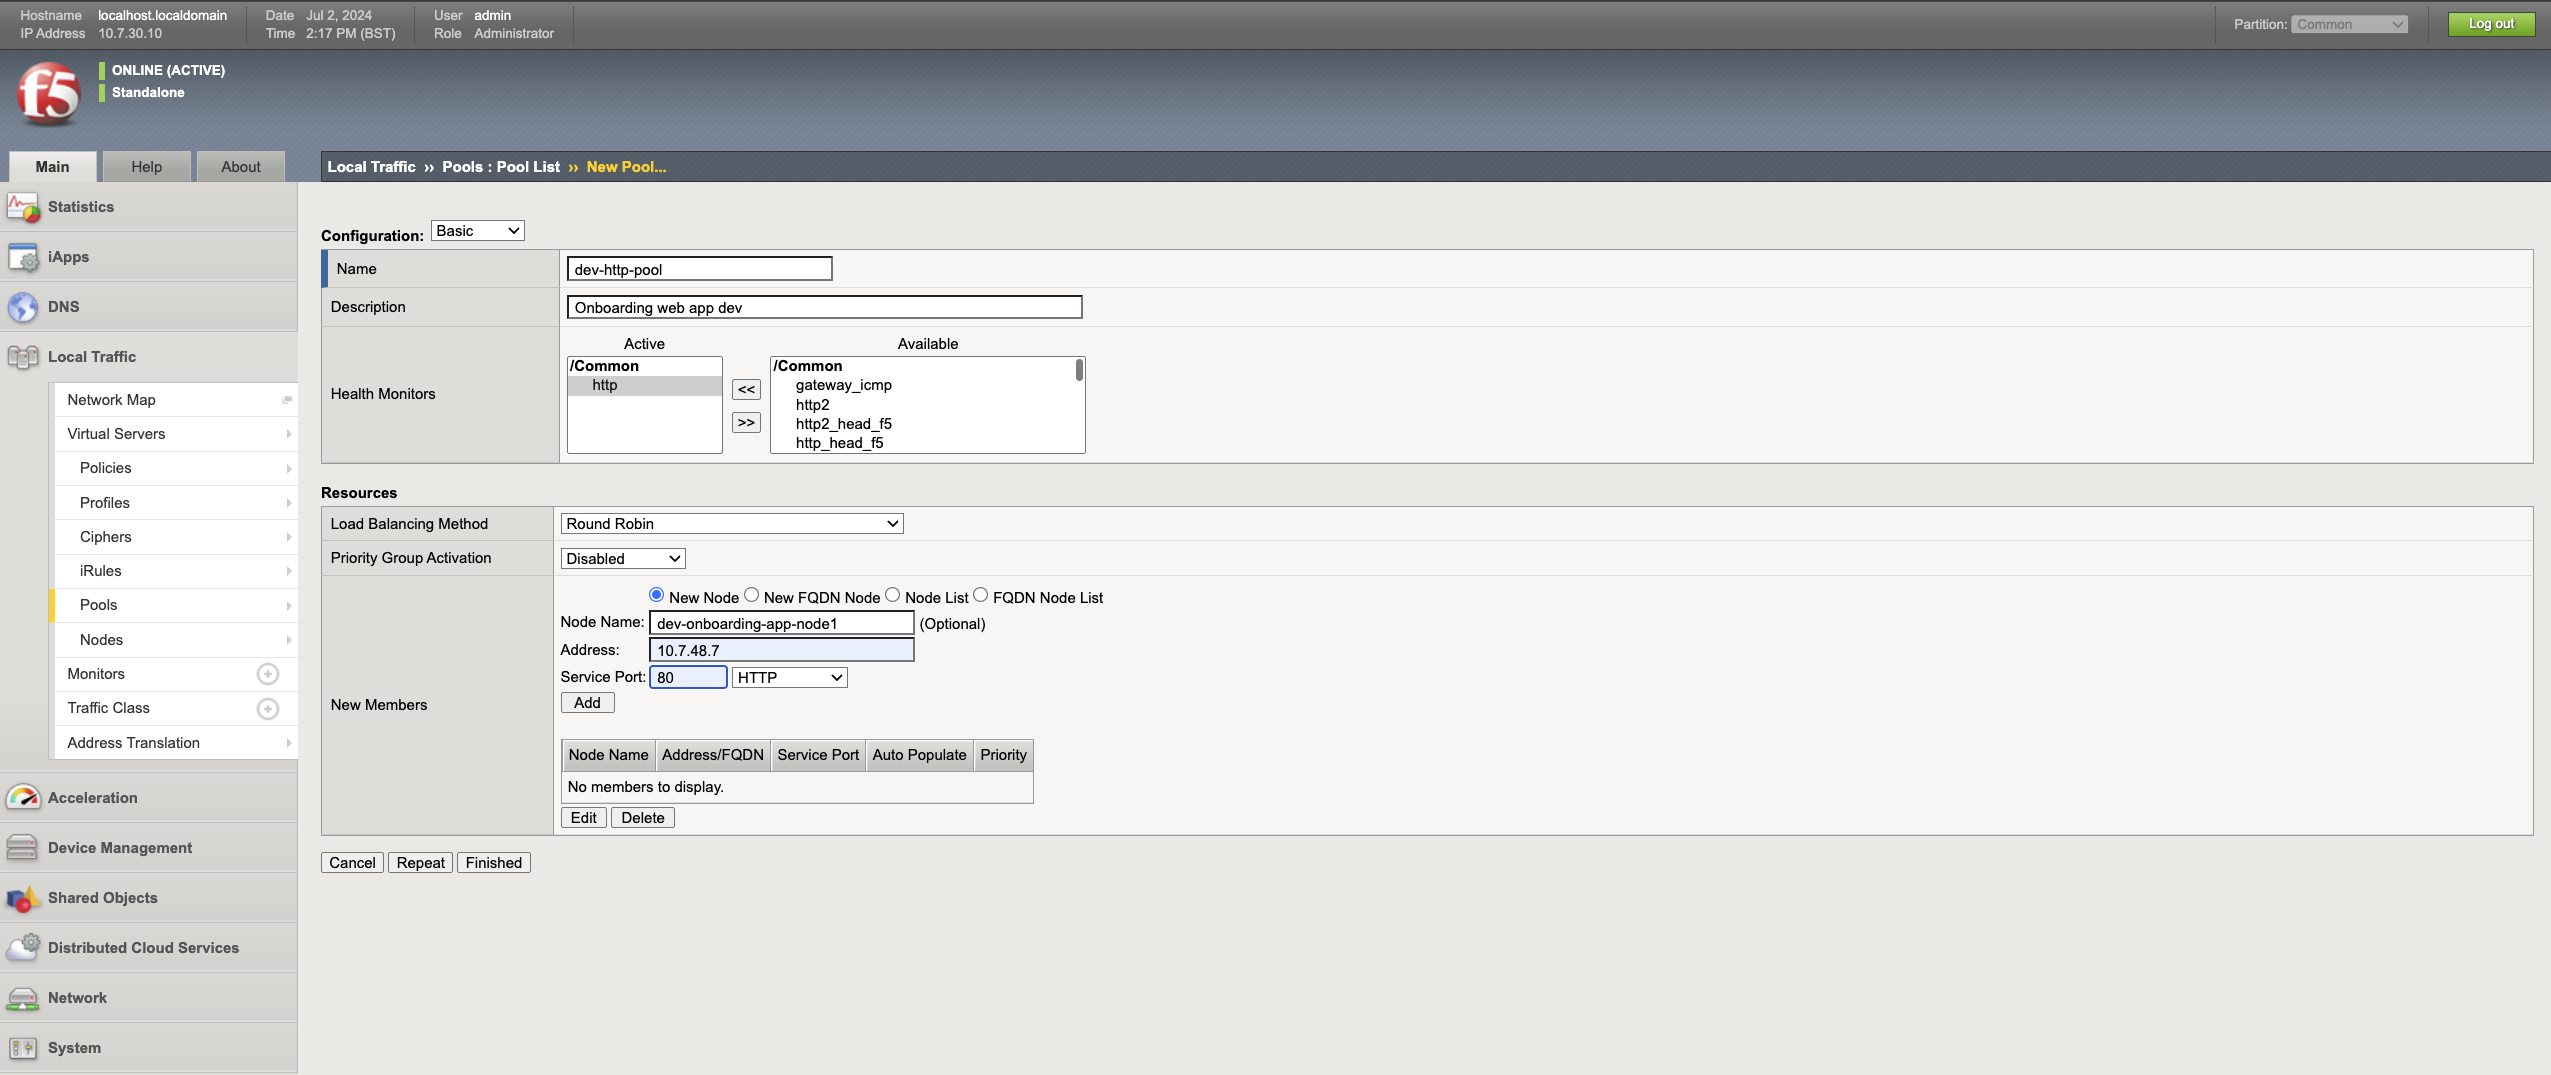
2 - HTTP pool を作成
HTTP pool は、F5 によって保護する必要がある Web サーバーのプールを表します。
- Local traffic -> Pools に移動し、Create をクリックします。
- 適切な名前と説明を入力します。例: Name -
dev-http-pool, Description -Onboarding web app dev。 - Under Health monitors, select
httpfrom the Available column and move it to the Active column. - 適切な Node name を入力します。例:
dev-onboarding-app-node1。 - Web サーバーの IP アドレスとポートを入力し、Add をクリックします。
- 設定を保存するには Finished をクリックします。ヘルスチェックが成功するとステータスは緑色で表示され、失敗すると赤色で表示されます。
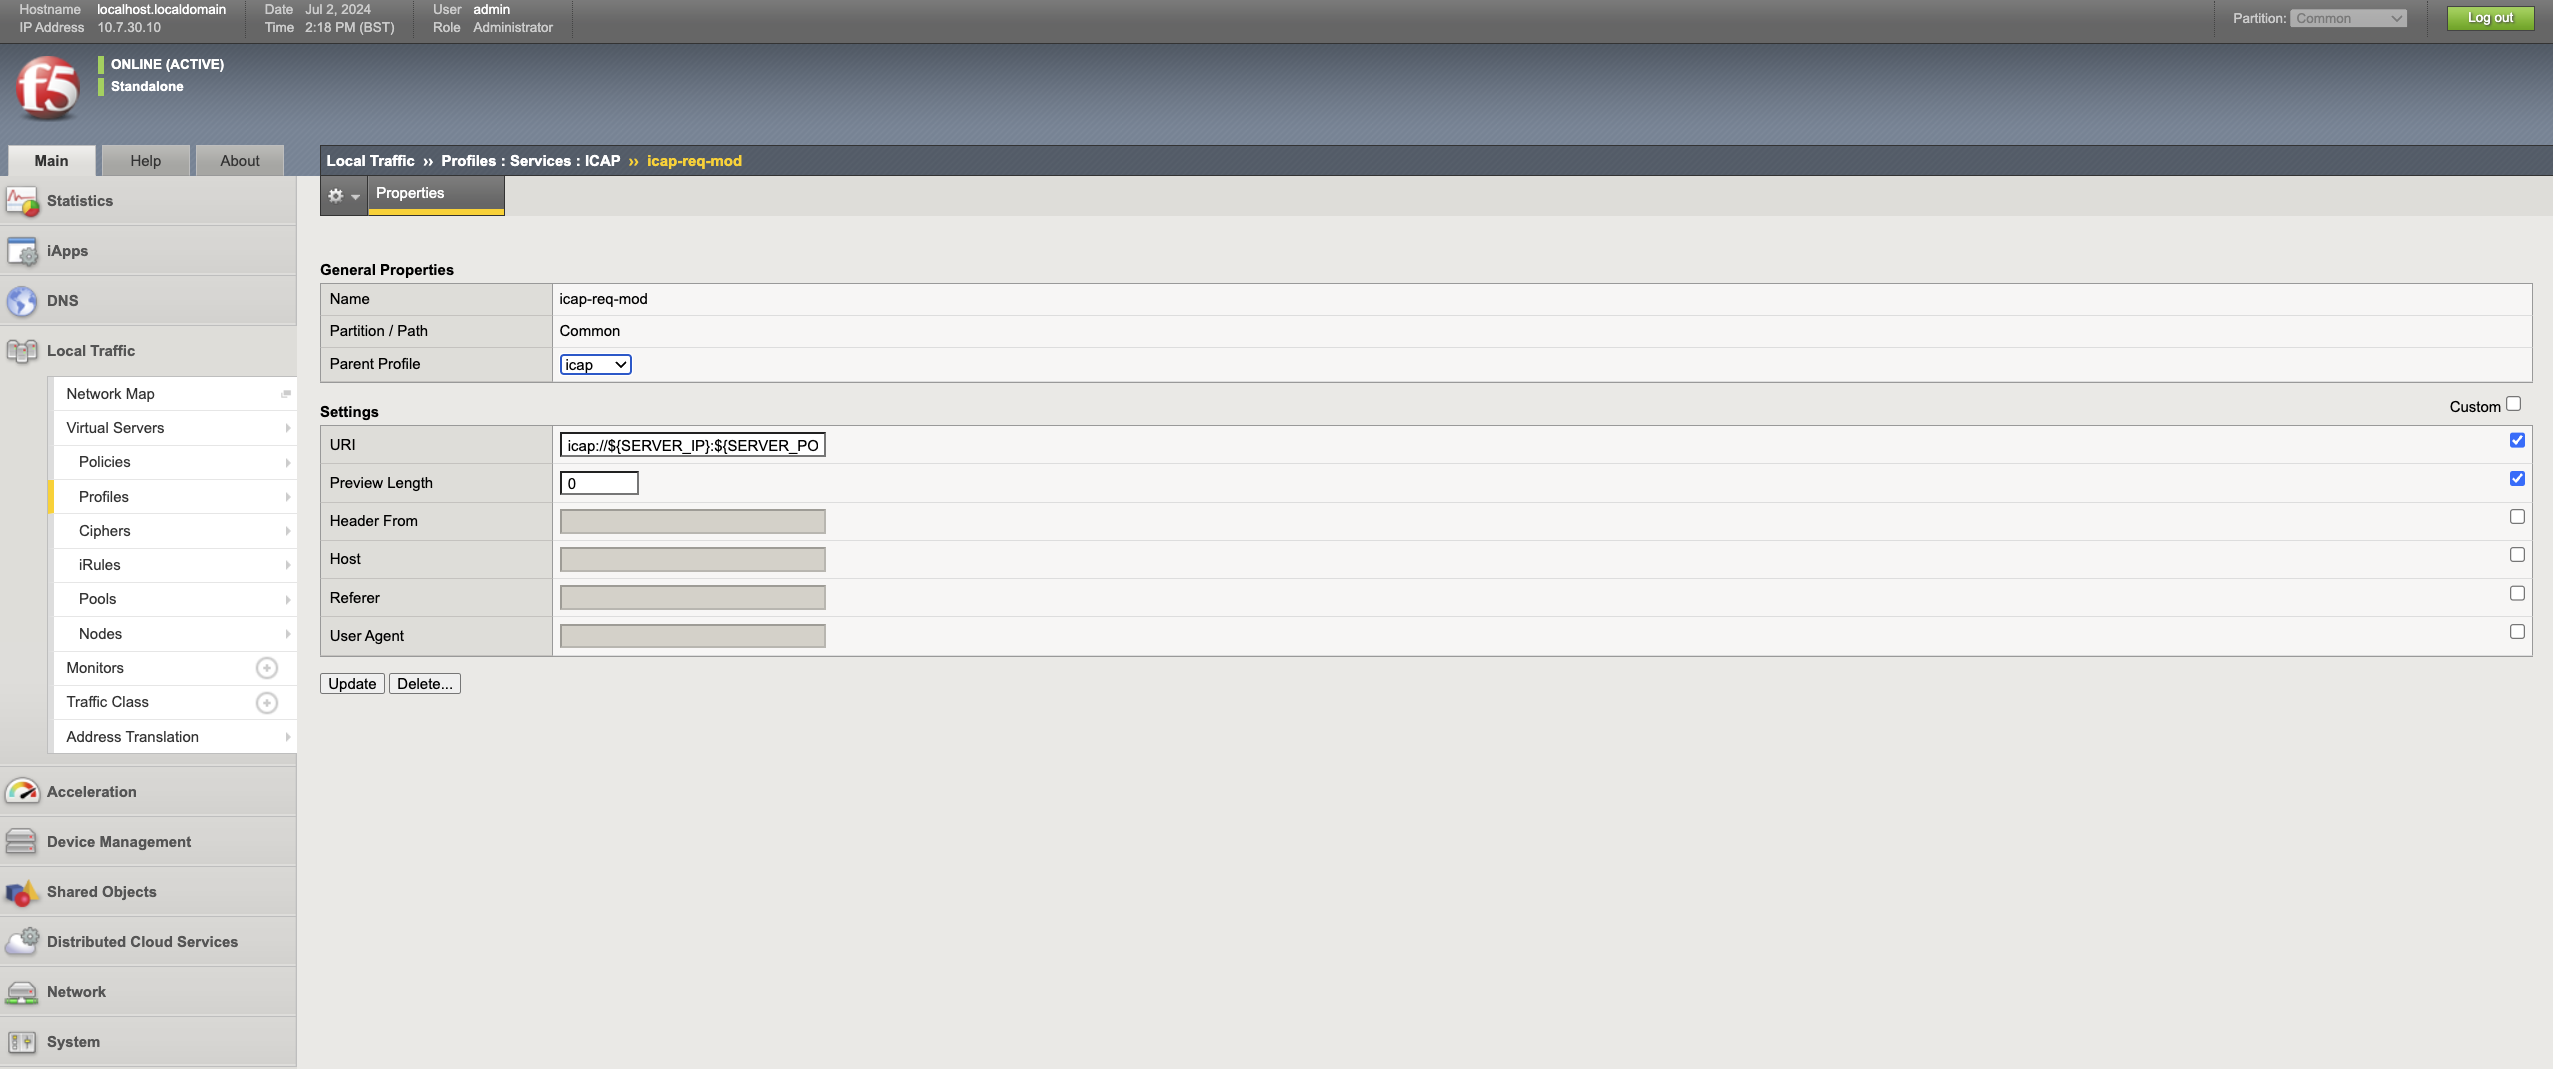
3 - ICAP profile を作成
ICAP profile は、コンテンツに CDR を適用するために、HTTP virtual server から ICAP サーバーへトラフィックを送信するために使用されます。このシナリオでは Web サーバーにアップロードされるファイルを処理したいため、ICAP で request modification service を使用する必要があります。
- Local traffic -> Profiles -> Services -> ICAP に移動し、Create をクリックします。
- 適切な名前を入力します。例:
dev-icap-req-mod。 - Select ICAP as the Parent profile.
- Select the Custom box in settings and enter
icap://${SERVER_IP}:${SERVER_PORT}/req-cdr-service?profile=defaultin the URL. You can use a custom ICAP profile if needed. - 必要に応じて他のフィールドも入力し、Finished をクリックします。
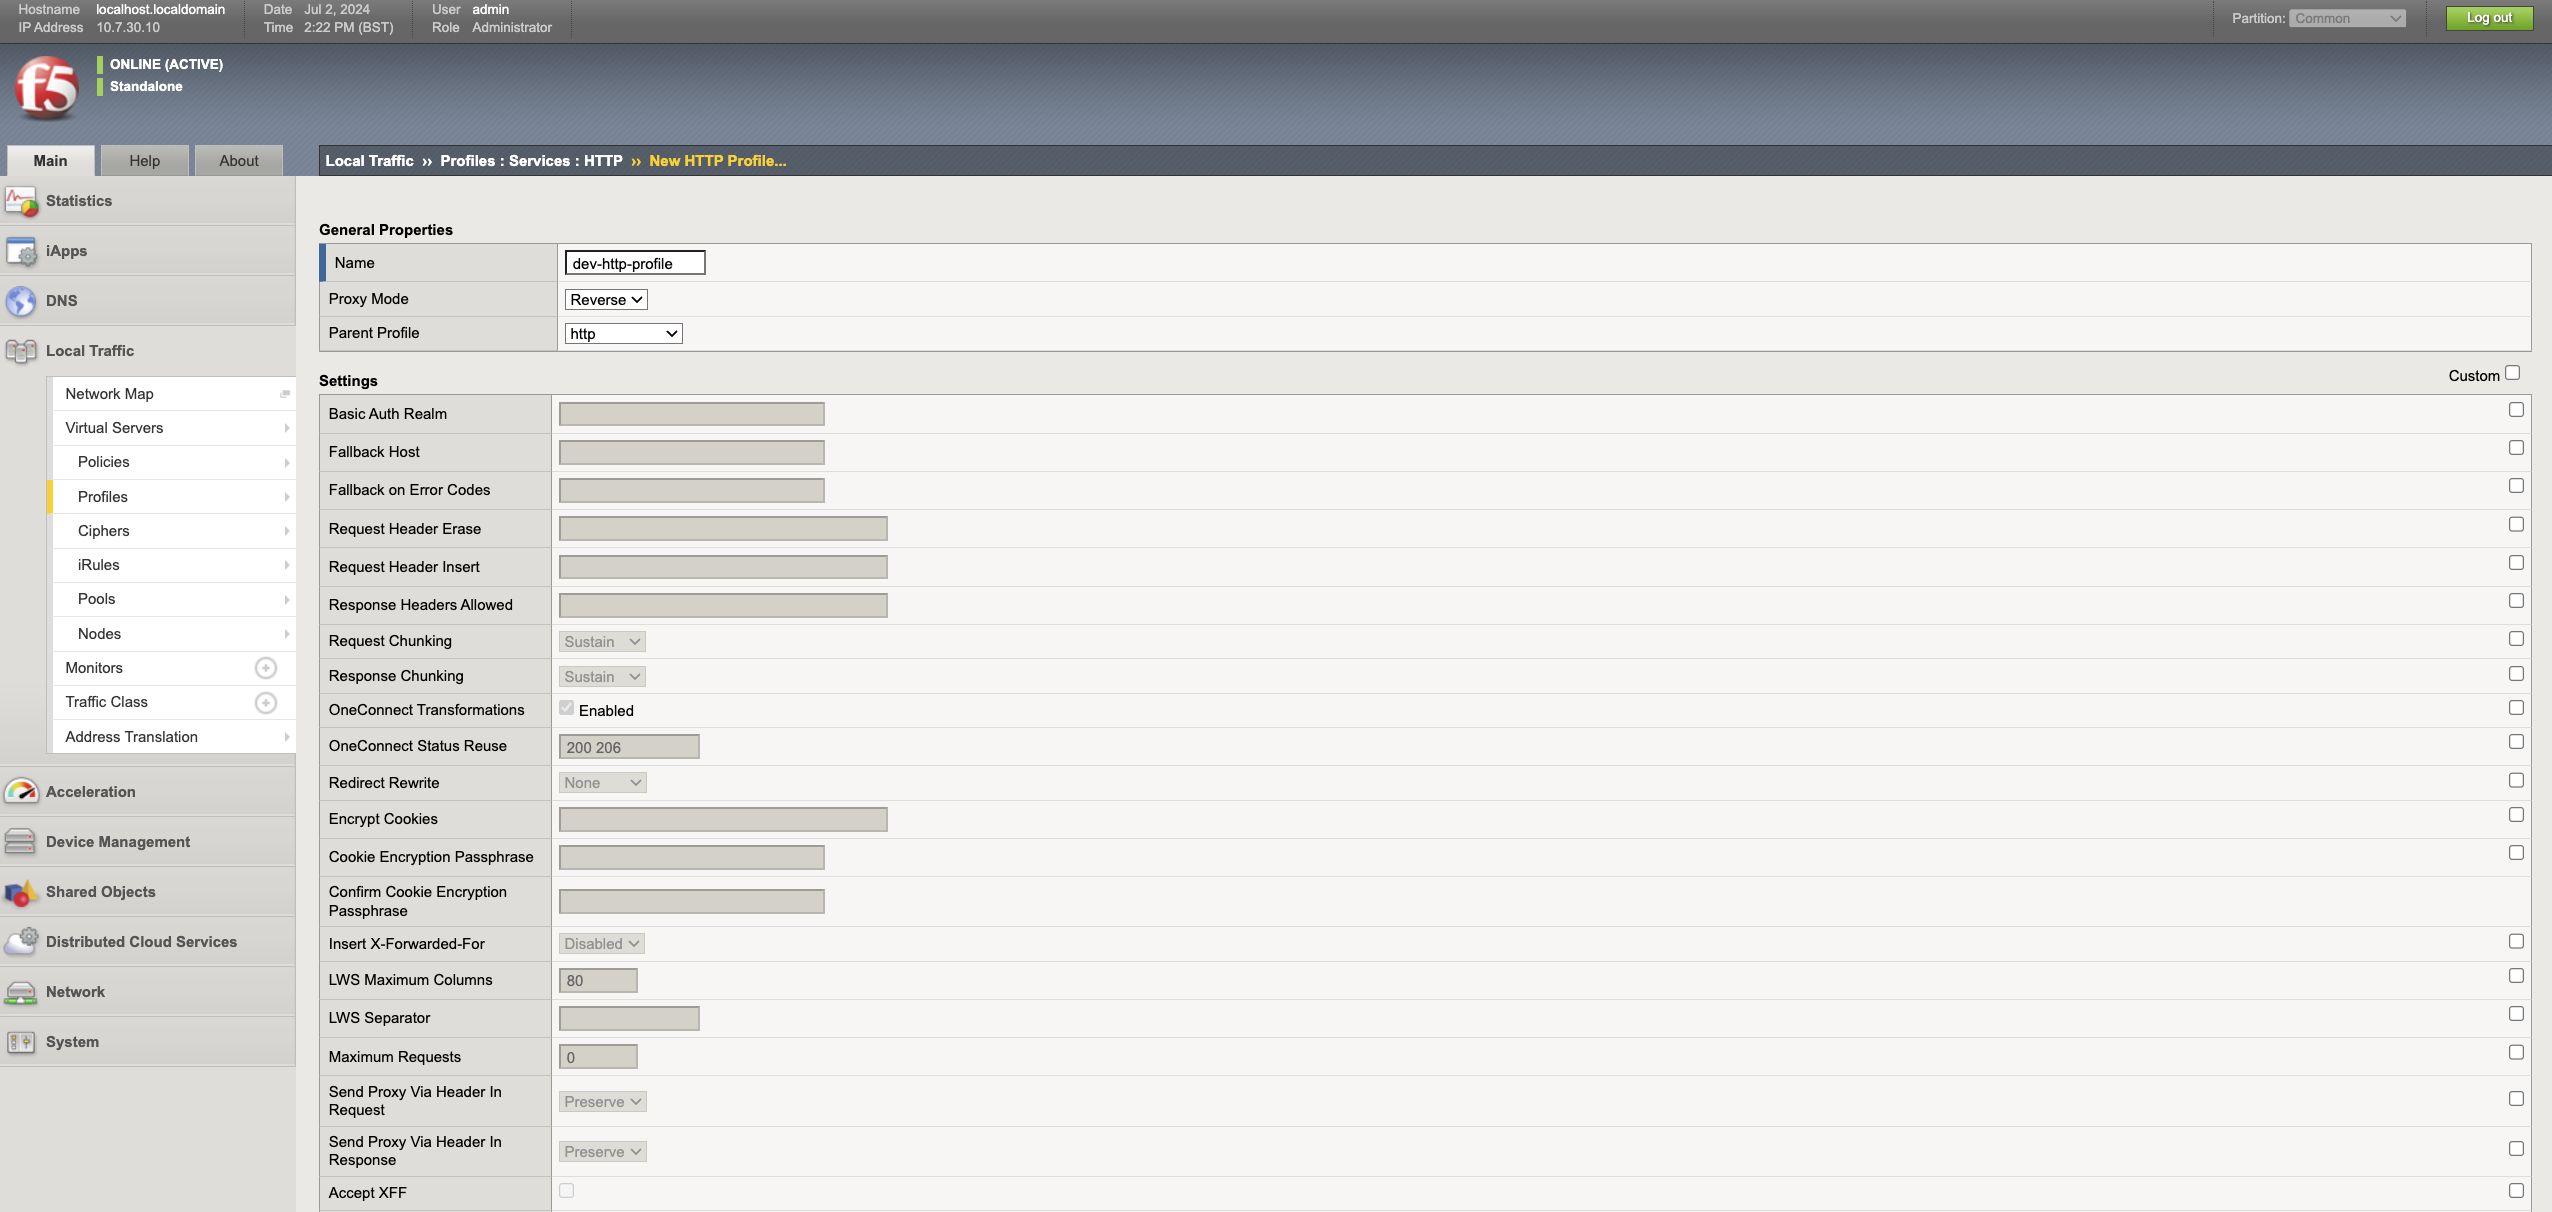
4 - HTTP profile を作成
カスタム HTTP profile を使用して、Web サーバーの HTTP トラフィックを変更できます。
- Local traffic -> Profiles -> Services -> HTTP に移動し、Create をクリックします。
- 適切な名前を入力します。例:
dev-http-profile。 - HTTP を親 profileとして選択します。
- Select the Custom box on the Settings and customise the settings as required.
- Finished をクリックして profile を保存します。
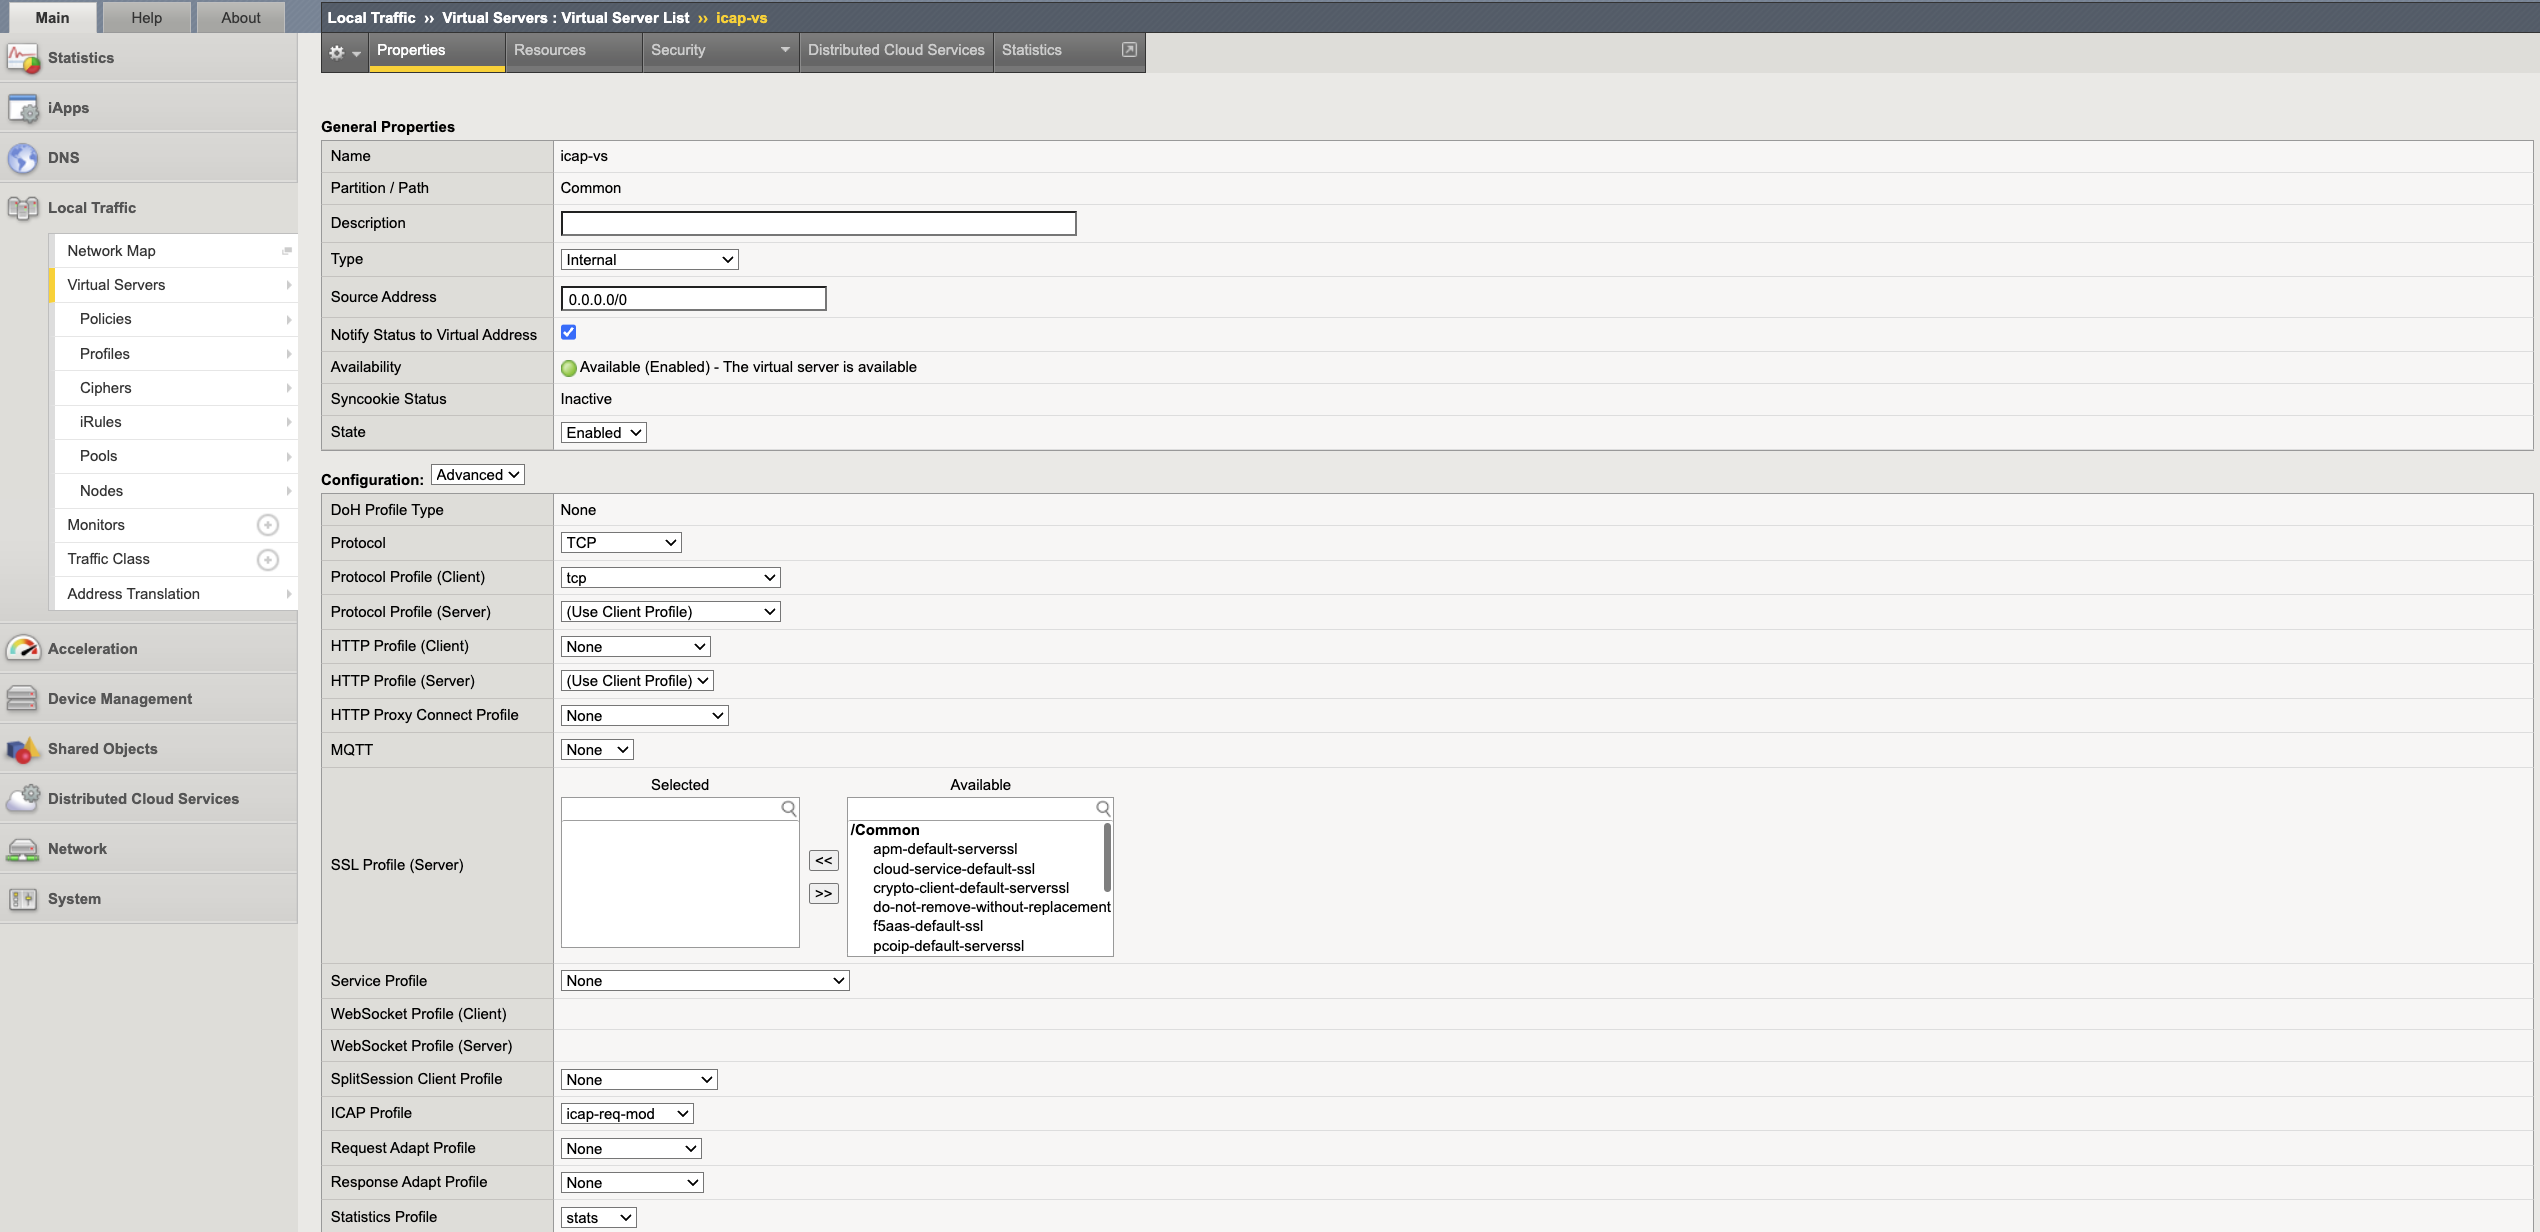
5 - ICAP 内部仮想サーバーを作成
内部仮想サーバーは、トラフィックを ICAP サーバーに送信するために使用される特別な種類の仮想サーバーです。ICAP 仮想サーバーは ICAP pool の前段に配置されます。
- Local traffic -> Virtual servers -> Virtual servers list に移動し、Create をクリックします。
- 適切な名前と説明を入力します。例:
dev-icap-vs。 - Type として
Internalを選択し、送信元アドレスとして0.0.0.0/0を入力します。 Advanced構成を選択し、ICAP profile で手順 3 で作成した ICAP profile を選択します。Default Poolで、手順 1 で作成した ICAP pool を選択します。- Finished をクリックして仮想サーバーを保存します。
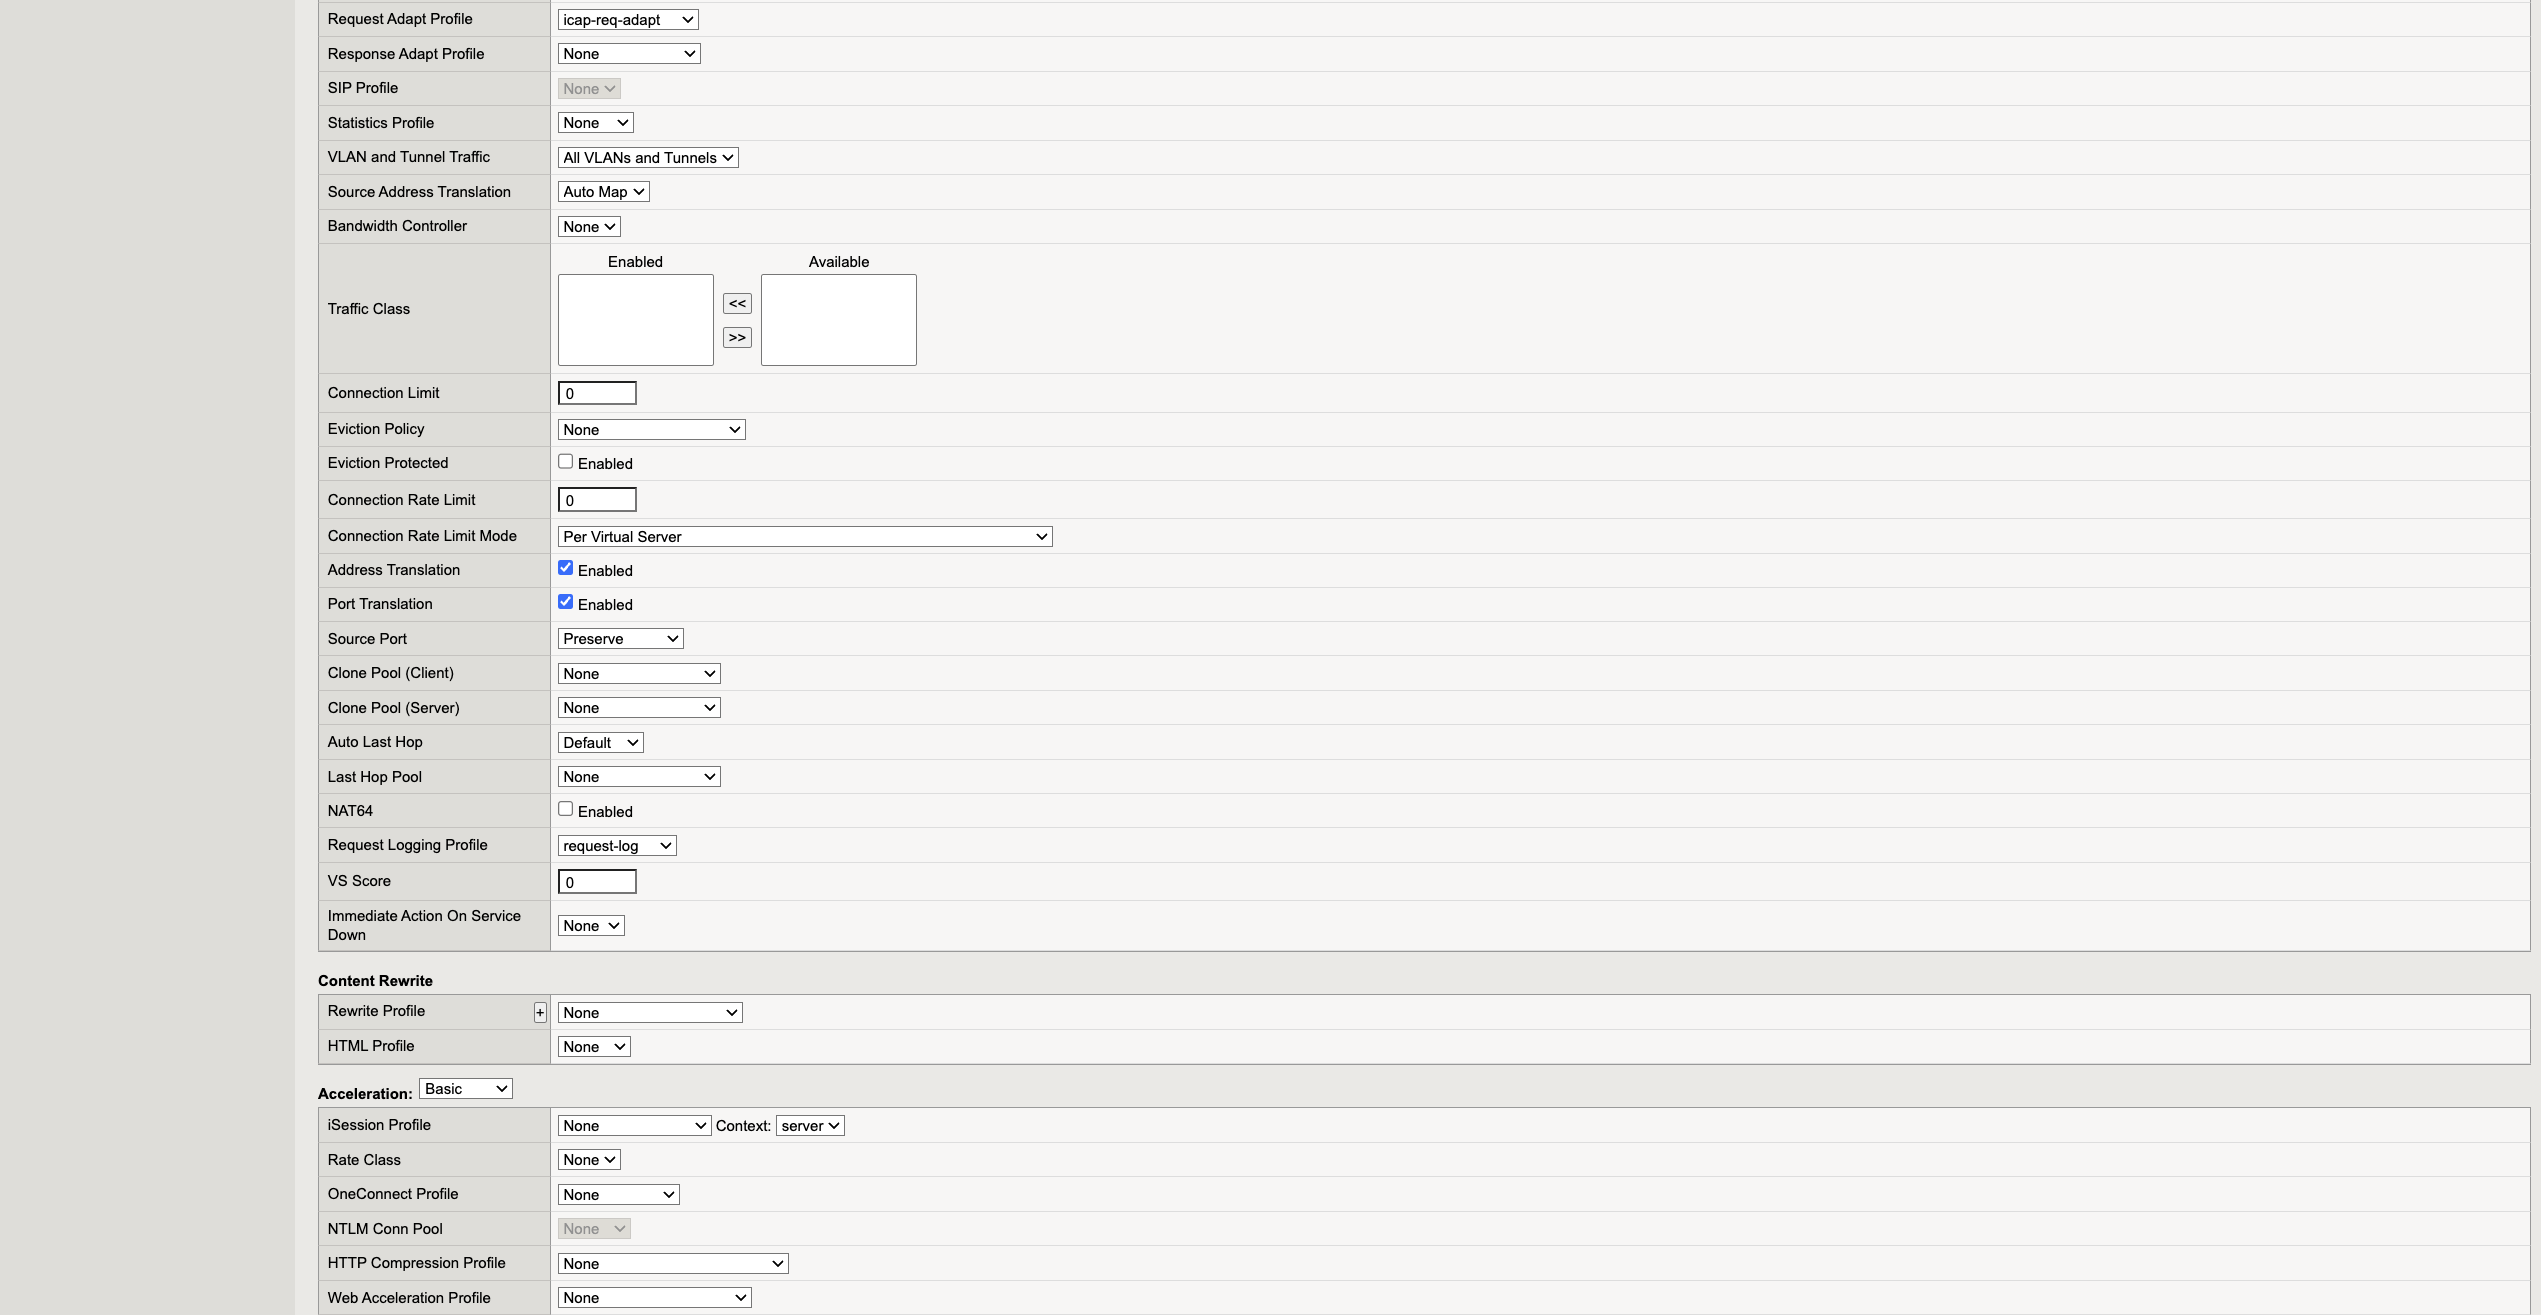
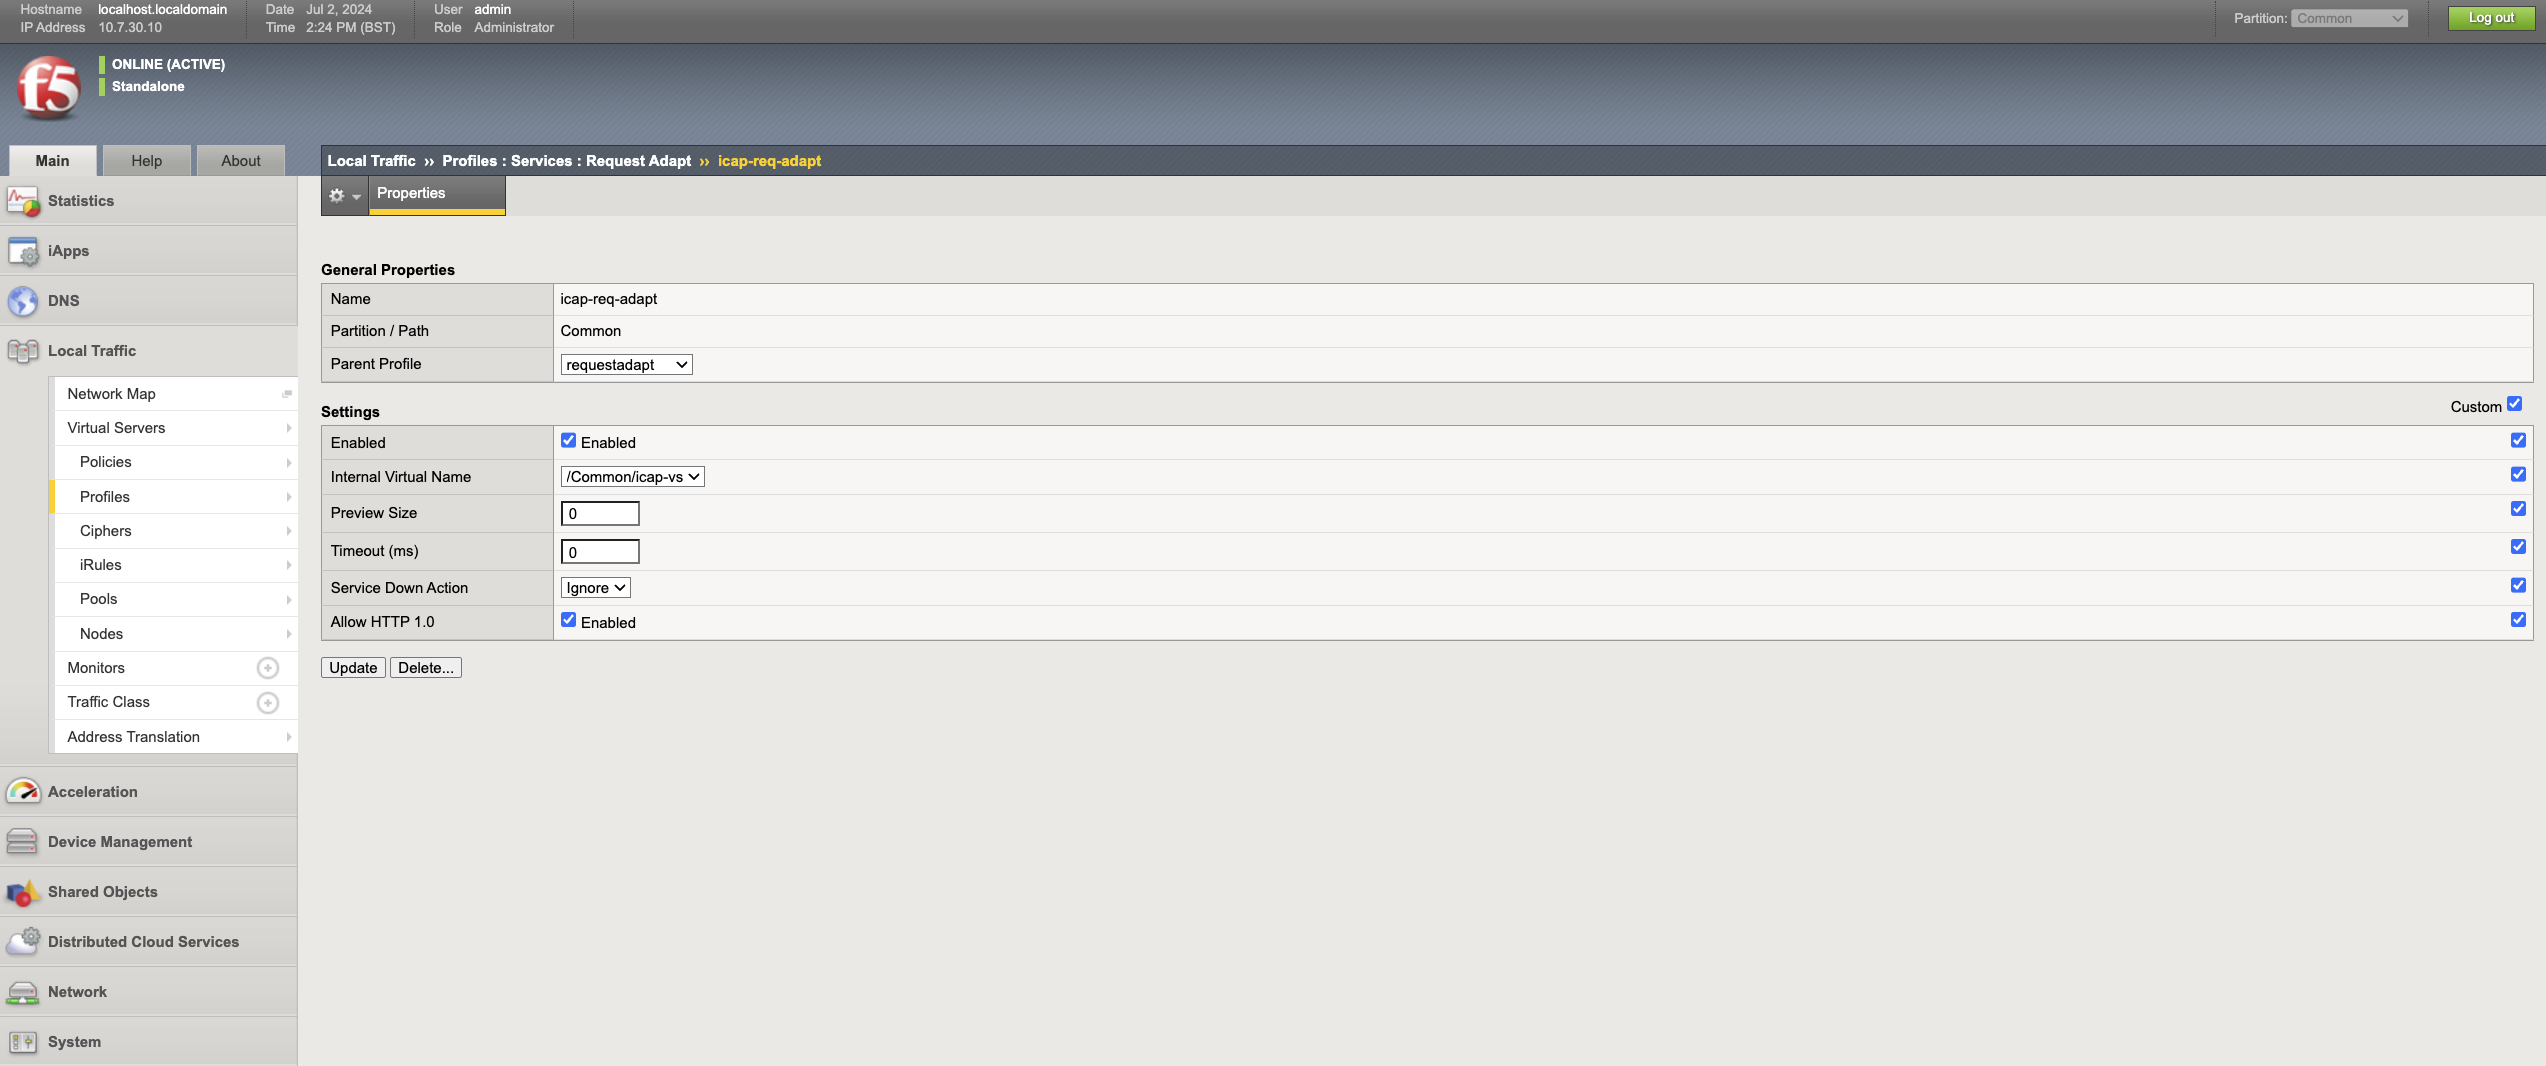
6 - リクエスト adapt profile を作成
- Local traffic -> Profiles -> Services -> Request adapt に移動し、Create をクリックします。
- 適切な名前を入力します。例:
dev-icap-req-adapt。 - Parent profile で、
requestadaptを選択します。 - Select the Custom box in Settings, and select the internal ICAP virtual server created in Step 6 in the internal virtual name drop-down.
- 必要に応じてサービスダウン時のアクションを選択します。これは、ICAP サーバーがダウンしているときに実行されるアクションを表します。
-
Drop: HTTP 仮想サーバーでトラフィックを破棄します。 -Reset: クライアント側の接続をリセットします。 -Ignore: 元のトラフィックを Web サーバーに送信します。 - Finished をクリックして、リクエスト適応 profile を保存します。
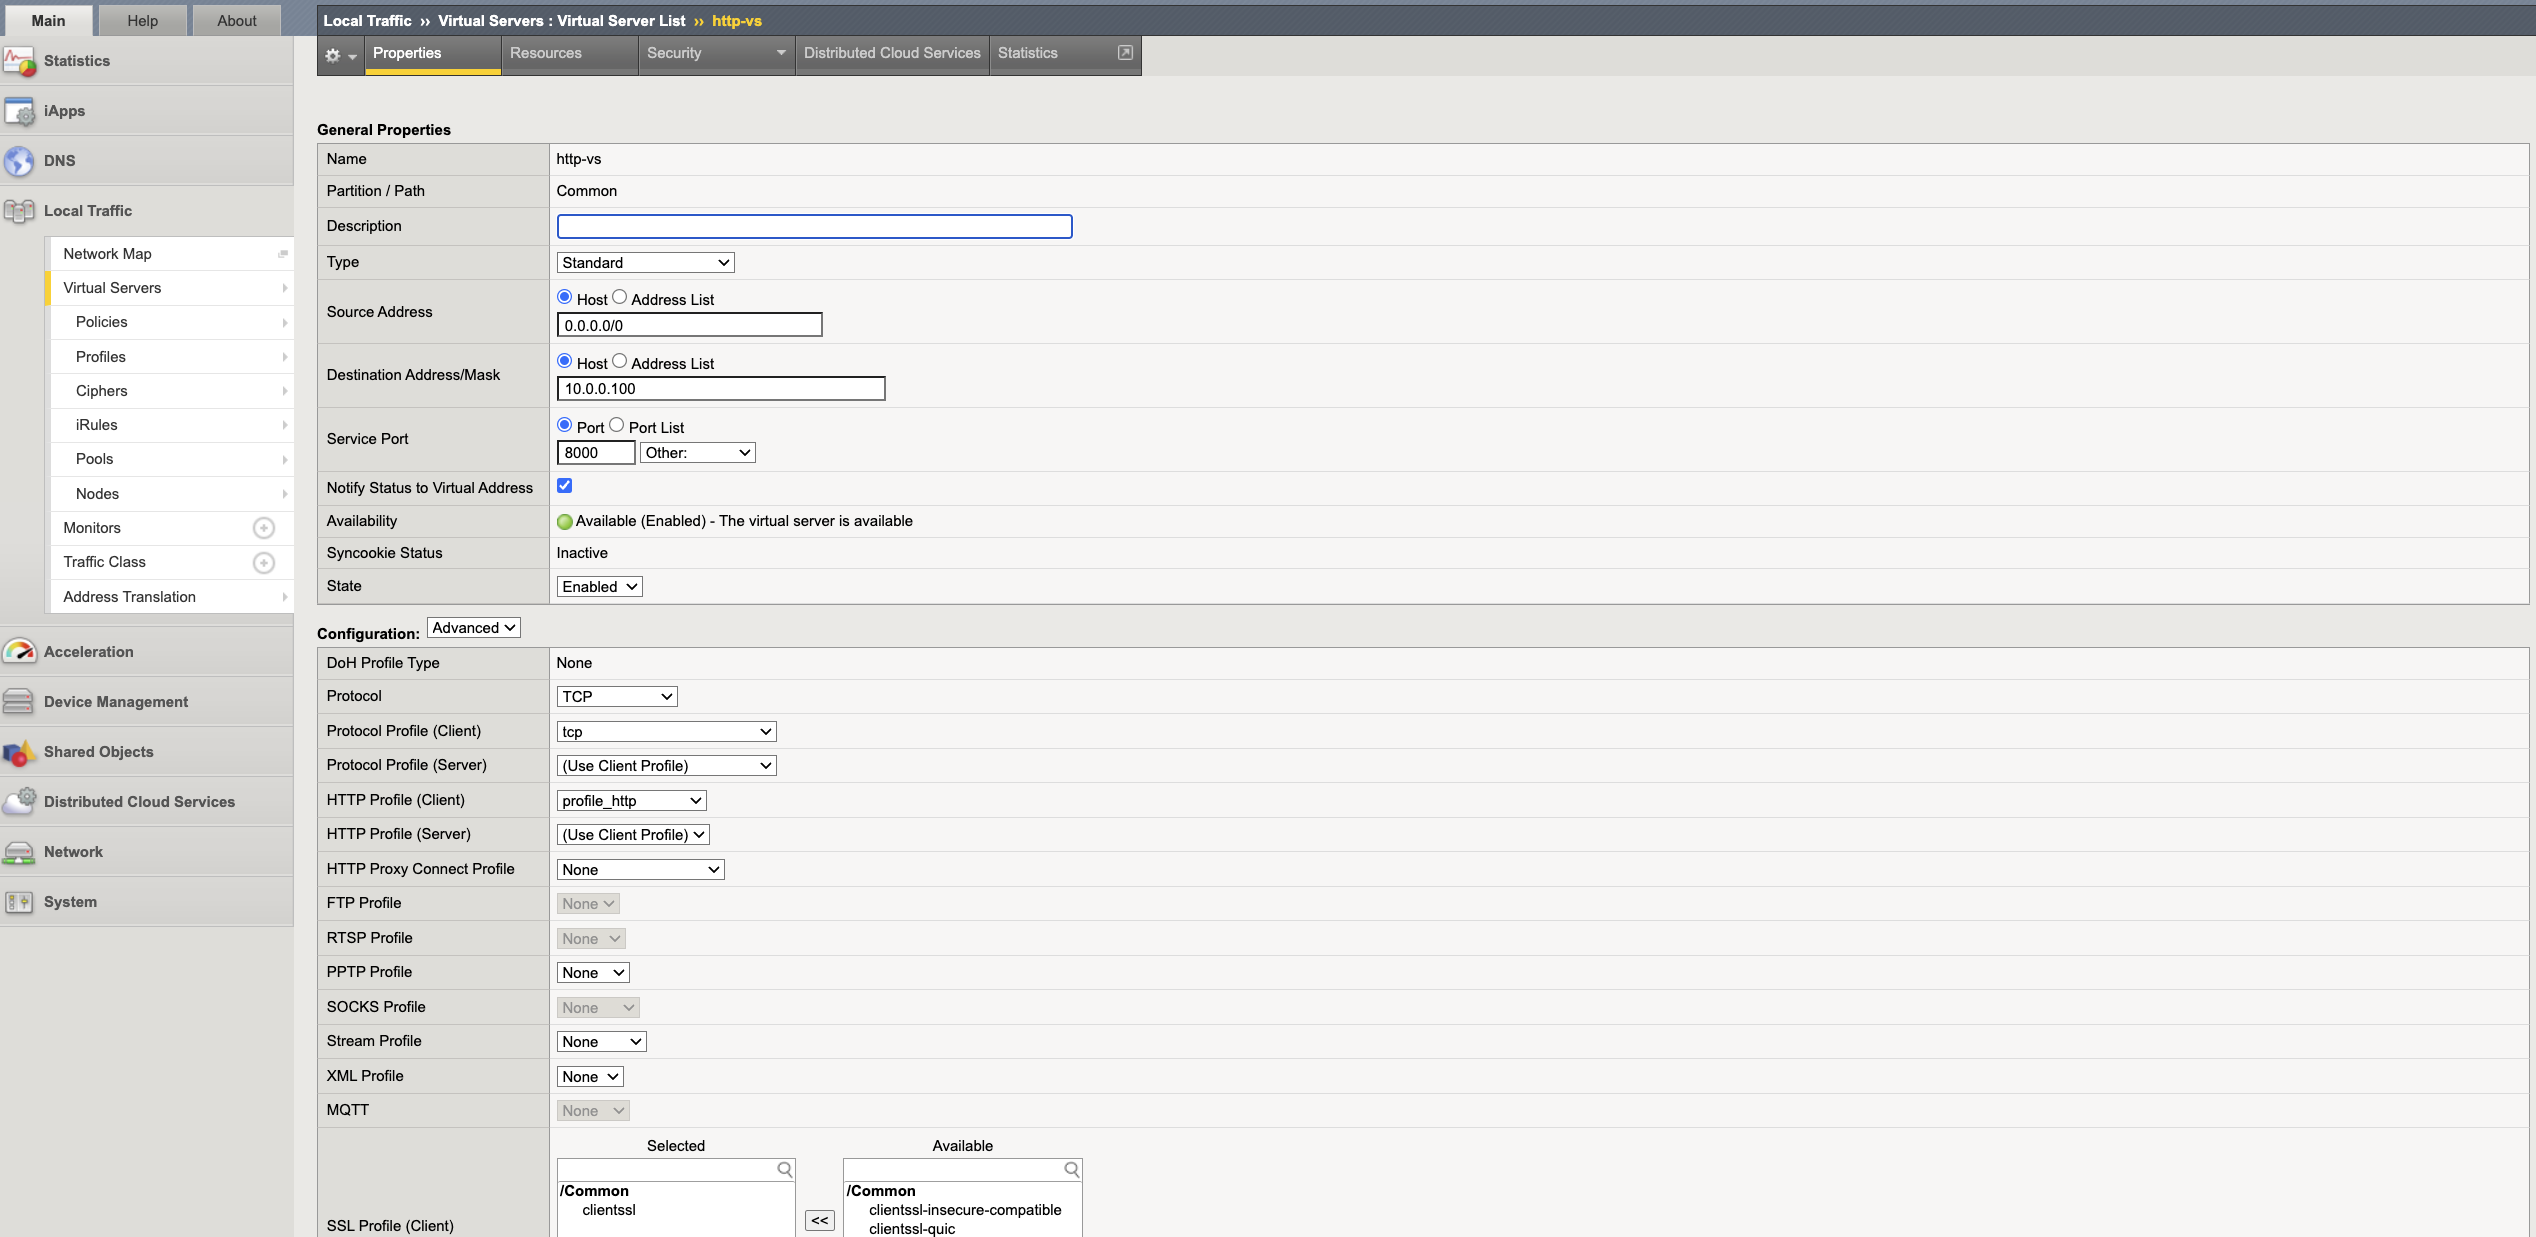
7 - HTTP 仮想サーバーを作成
HTTP 仮想サーバーは HTTP プールの前段に配置され、ユーザーが保護された Web サーバーにアクセスするために使用できる仮想 IP アドレスを提供します。
- Local traffic -> Virtual servers -> Virtual servers list に移動し、Create をクリックします。
- 適切な名前を入力します。例:
dev-onboarding-http-vs。 - Enter
0.0.0.0/0in the Source address. - 他のどのアドレス空間とも競合しない HTTP 仮想サーバー用の IP アドレスを選択し、それを宛先アドレスとして入力します。
- Web サーバーのポートをサーバーポートとして入力します。
- Advanced 構成を選択し、
HTTP Profile(Client)でステップ 4 で作成した HTTP profile を選択します。 - request adapt profile で、ステップ 6 で作成したリクエスト適応 profile を選択します。
- Select Auto map under the Source address translation drop-down.
- Default pool で HTTP プールを選択し、Finished をクリックします。